
To write an Atlassian Connect add-on in Java, the Connect quick start guide tells you to use the Play framework. There should be room for another Java based framework. This is where Spring Boot kicks in. Spring Boot is a very opinionated framework to build microservices. It will help you to get going rapidly via the notion of starters. These starters allow you to bootstrap a service simply by adding a dependency. The Spring Boot Connect starter will transform your Spring Boot microservice into a fully functional Connect add-on by handling all Connect plumbing out of the box:
- Serving the Connect add-on descriptor
- Add-on lifecycle management
- JWT integration with Spring Security
- JWT signed callbacks into the host product
That sounds awesome show me how
0. The prerequisites
For this tuturial you need a working Java development environment. This requires the following to be installed on your machine:
- JDK8
- Maven 3.3.9; Pro tip: We love to use mvnvm
- Configured Atlassian Maven Proxy
- Your favourite IDE
1. Create a Spring Boot service
Bootstrap a Spring Boot service by creating an empty Maven project and add the following snippet to your pom.xml.
<parent>
    <groupId>org.springframework.boot</groupId>
    <artifactId>spring-boot-starter-parent</artifactId>
    <version>1.3.3.RELEASE</version>
</parent>
<dependencies>
    <dependency>
        <groupId>org.springframework.boot</groupId>
        <artifactId>spring-boot-starter-web</artifactId>
    </dependency>
</dependencies>
2. Turn your service into a Connect add-on
Simply add a dependency to the Spring Boot Connect starter to transform your microservice into a Connect add-on.
<dependency>
    <groupId>com.atlassian.connect</groupId>
    <artifactId>ac-spring-boot-autoconfigure</artifactId>
    <version>0.7</version>
</dependency>
3. Define a Connect add-on descriptor
Define a descriptor by adding a file called atlassian-connect.mustache in the resource folder. It supports substitution for all environment variables and the hostname. Custom substitution descriptors are supported as well.
{
"name": "Spring Boot Lightning Demo",
"description": "Doesn't do heaps",
"key": "com.atlassian.lightning",
"baseUrl": "{{hostname}}",
"vendor": {
"name": "Atlassian",
"url": "http://www.atlassian.com"
},
"authentication": {
"type": "jwt"
},
"lifecycle": {
"installed": "/connect/lifecycle",
"uninstalled": "/connect/lifecycle",
"enabled": "/connect/lifecycle",
"disabled": "/connect/lifecycle"
},
"apiVersion": 1,
"scopes": [
"read"
],
"modules": {
"webItems": [
{
"url": "/show?contentId={content.id}",
"location": "system.content.action",
"context": "addon",
"target": {
"type": "page"
},
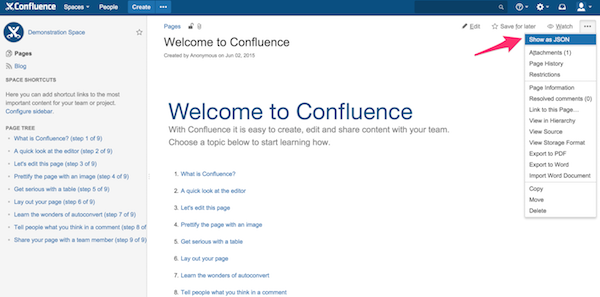
"tooltip": {
"value": "Show as JSON"
},
"key": "lightning-to-json",
"name": {
"value": "Show as JSON"
}
}
]
}
}
4. Add a Controller to implement a feature
The descriptor above describes an endpoint available via the path /show. Let’s create a controller that does the job. The example below will call back to the Confluence host via Spring’s RestTemplate. It will get the content of the page as JSON and returns it as such. All authentication like verifying the incoming call and signing the outgoing REST call is taken care of.
@Controller

public class LightningController {

    private static final String PAGE_URL = "%s/rest/api/content/%s?expand=body.styled_view";

    @Autowired
    private RestTemplate restTemplate;

    @RequestMapping(value = "/show", produces = "application/json")
    public @ResponseBody String show(@RequestParam long contentId) {
        final String baseURL = TenantRequestContextHolder.getContext().get()
                                                          .getTenantContext().getBaseUrl();
        final String contentUrl = String.format(PAGE_URL, baseURL, contentId);
        return restTemplate.getForObject(contentUrl, String.class);
    }
}
5. Demo time
- Start the service standalone or in your IDE
- Start Confluence as described in the Connect documentation
- Install the add-on via UPM; The add-on URL is: http://localhost:8080/connect/atlassian-connect.json
- And see for yourself
Hungry for more?
Find the source code and roadmap in the Bitbucket repository. Raise an issue for bugs and feature requests or even contribute by opening a pull request. Have questions about this tutorial? Please leave a comment.