

When building a Forge app for an Atlassian product, it's important to have a robust testing strategy in place. End-to-end testing provides a way to constantly monitor the quality and reliability of apps and, in this blog post, we will explore how to leverage Mocha and Webdriver.io to test two Confluence apps. We will also provide code samples and a video recording of the tests running, helping you get started quickly and confidently.
We don't want this blog to be a recommendation of how to set up an end-to-end test strategy, but rather consider it a starting point based on our knowledge and feedback from the community.
WebdriverIO
Following the getting started guide of WebdriverIO, create a new project with the helpful configuration wizard.
There are a few settings to choose from when running npm init wdio .:
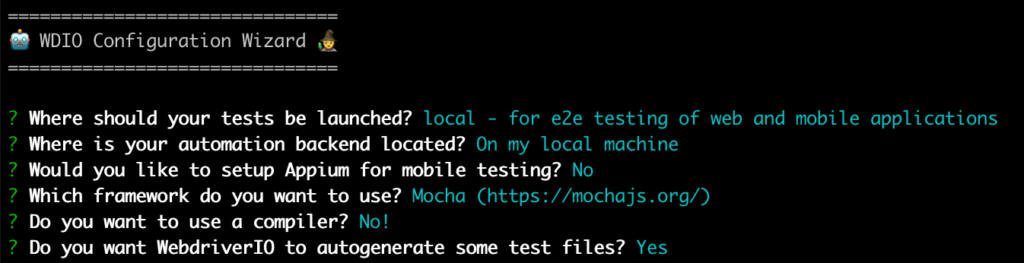
As a framework, I opted for the Mocha (https://mochajs.org/) default one which seemed to be a good option for testing my apps as it provided all the features needed and was easy to get started.
The last question in the screenshot above offers to generate some test files. When answering yes, an example.e2e.js file is created in the test/specs folder. This is the file where we will be adding the code for our tests.
Once the tests are ready to be run, simply run the following command from the root folder of the project:
npx wdio ./wdio.conf.jsThe Forge apps
For comprehensive test scenarios, we will be using two apps. Each one of them uses a different way of building the user interface and is based on an available tutorial so that you can follow along as well.
Install both apps on the same Confluence Cloud site so that the test will only require one single login.
The Hello world app is a Confluence Macro app, which uses UI kit for the UI. The second app uses a Custom UI and adds a content byline item to each page, the tutorial is available here.
The logic for the tests is different based on the chosen user interface option. Custom UI apps add an iframe tag to the Confluence pages and this requires additional requests for our test to be successful. UI kit apps instead add the additional elements directly to the Confluence HTML without the need for an iframe.
The tests
baseUrl set up
To avoid repeating the baseUrl or our test site in each test, let's add it to the wdio.conf.js file in the root folder of our project.
//
// Set a base URL in order to shorten url command calls.
// If your `url` parameter starts with `/`, the base url gets prepended,
// not including the path portion of your baseUrl.
// If your `url` parameter starts without a scheme or `/`
// (like `some/path`), the base url gets prepended directly.
baseUrl: 'https://<your-test-site>.atlassian.net',
WebdriverIO prepends the specified baseUrl to each browser.url(‘…’) request so, if we change our test site, we only need to update this Url in one place.
Logging in to a site
The first step for testing an app is to log in to the site by entering the user email and password. We will set and read them as Node.js environment variable with USER_ID and USER_KEY as variable names.
On a Mac, export the environment variables using the following commands in a terminal:
export USER_ID=<user_email_address>
export USER_KEY=<user_password>
The login code runs in a WebdriverIO before hook and looks as below:
before('Login', async () => {

  await browser.url('/login')

  await $('#username').setValue(`${process.env.USER_ID}`)
  await $('button[type="submit"]').click()

  await $('#password').waitForDisplayed()
  await $('#password').setValue(`${process.env.USER_KEY}`)
  await $('button[type="submit"]').click()

  // wait for the Jira homepage to be loaded
  // otherwise the user will not be logged in when switching to Confluence
  await $('h1=Your work').waitForDisplayed()

});
The "Confluence – content byline item – Custom UI" test
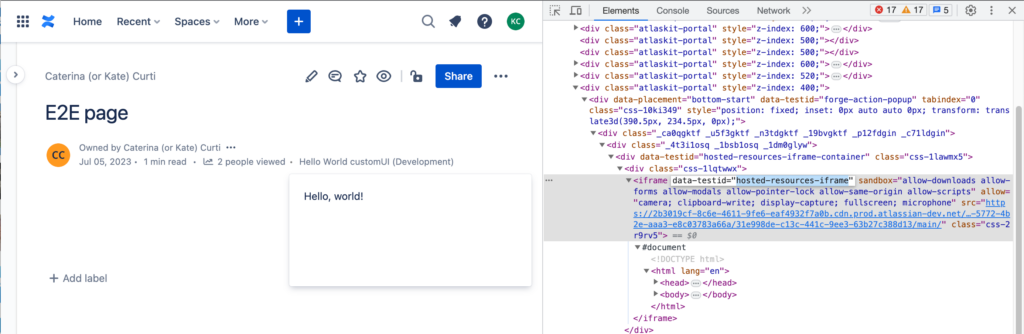
The Custom UI app adds a content byline item to each page of a Confluence site. Our test checks that the item is visible, clicks on to open the iframe provided by the app, and switches to it via the browser.switchToFrame WebdriverIO method. Once the root div in the iframe is loaded, the expect assertion looks for the "Hello, world!" text.
If the text is found our test is successful, otherwise, it will fail.
The app has been created with "Hello World customUI" as title in the manifest.yml. The line below needs to be updated with the value you specified as title without removing the " (Development)" text.
const contentBylineItem = await $('span=Hello World customUI (Development)');Let's have a look at the code:
it('Confluence - content byline item - Custom UI', async () => {
  const pageUrl = '/wiki/spaces/~5570572bce73f169c645208c2754b7b649f63c/pages/3178497/E2E+page';
  await browser.url(pageUrl);

  const contentBylineItem = await $('span=Hello World customUI (Development)');
  await(contentBylineItem).waitForDisplayed();
  await(contentBylineItem).click();

  const customUIIframe = await $('iframe[data-testid="hosted-resources-iframe"]');
  await(customUIIframe).waitForDisplayed();

  browser.switchToFrame(customUIIframe);

  const divInIframe = await $('div[id="root"]');
  await(divInIframe).waitForDisplayed();

  await expect(divInIframe).toHaveText('Hello, world!');

  await browser.pause(3000); // demo purposes
});
Remember to replace the pageUrl with a page on your site.
Here is a video showing the test running:
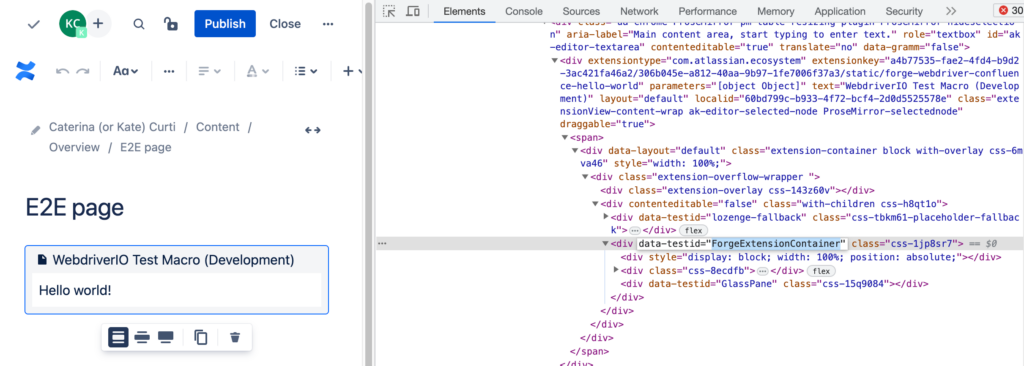
The "Confluence – Macro – UI Kit" test
This test starts with a page in edit mode and implements the logic for adding a macro and checking its content once it's loaded. It then discards the changes so that it will start from an empty page at the next run.
The test is successful if the "Hello world!" is added to the page by the macro.
When creating the app, I used "WebdriverIO Test Macro" as the title attribute in the manifest.yml. Before running the test, update these two lines with the title you chose without removing the " (Development)" text.
browser.keys('Test macro: /WebdriverIO');
const macro = await $('aria/WebdriverIO Test Macro (Development)');
Here is the entire test:
it('Confluence - Macro - UI Kit', async () => {
  const pageUrl = '/wiki/spaces/~5570572bce73f169c645208c2754b7b649f63c/pages/edit-v2/3178497';
  await browser.url(pageUrl);

  const contentArea = await $('aria/Main content area, start typing to enter text.');
  await(contentArea).waitForDisplayed();
  await(contentArea).click();

  // search for the macro
  browser.keys('Test macro: /WebdriverIO');

  const macro = await $('aria/WebdriverIO Test Macro (Development)');
  await(macro).waitForDisplayed();
  await(macro).click();

  const forgeMacro = await $('div[data-testid="ForgeExtensionContainer"]');
  await(forgeMacro).waitForDisplayed();

  await expect(forgeMacro).toHaveText('Hello world!');

  await browser.pause(3000); // demo purposes

  // discarding the changes by reverting to the previously saved page
  await $('div[data-testid="ellipsis-menu"]').click();
  const discardGroupItems = await $('div[data-testid="discard-group-items"]');
  await(discardGroupItems).waitForDisplayed();
  await(discardGroupItems).click();
  await browser.pause(3000); // demo purposes

  const submitButton = await $('span[data-testid="submit-button"]');
  await(submitButton).waitForDisplayed();
  await(submitButton).click();
  await browser.pause(3000); // demo purposes
});
Remember to replace the pageUrl with a page url in edit mode on your site.
Let's check the run of this test:
A few observations on the tests
- the apps have only been deployed to the Forge Development environment, this explains the " Development" suffix in a few selectors. It needs to be removed when testing in a production environment.
- wherever possible, we rely on the
data-testidselector. - the aria content selector is a good option when working with the Confluence editor and for selecting a macro.
- both tests have a
await browser.pause(3000); // demo purposesline. This is just so that the tested item would appear in the video recording, it should be removed to avoid unnecessary delays.
Wrapping up
From these small examples, we demonstrated that it is possible to run end-to-end tests for a Forge app using WebdriverIO for both Custom UI and UI kit apps.
Whether you're building an app for the Atlassian Marketplace or another use case, this is hopefully helpful to build a full test suite for your apps. If you have any questions about this or other topics, you can join the discussion in the Atlassian Developer Community.