

Introduction
This post will guide you on how to build AI app with the Atlassian Forge framework. The post takes you from the basics of getting started to practical considerations such as caching AI results, and then on to more advanced concepts like dealing with AI calls that take a long time to execute.
The post uses an open-source example app as a reference to explain various concepts and functionalities. The app demonstrates how to use the Forge APIs to provide UI polish such as creating flags to present results to users and it handles some edge cases, but not all. To keep the post reasonably concise, these aspects will be left for the reader to explore the source code.
 Note, the post assumes you are a reasonably proficient Javascript developer. The example app code is is in Typescript which helps to explain the types of various variables so it should be easier to understand. The post also assumes you have a basic understanding of Forge development. If not, you may like to read a Forge getting started guide.
A note on egressing user generated content (UGC)
The example app egresses user generated content (UGC) to OpenAI. Egressing refers to the process of sending data from one point to another. In this case, the data is sent from a Confluence Cloud tenant to OpenAI. It’s important to note that some customers may have concerns about egressing UGC due to data privacy and security. In addition to egressing data for processing, OpenAI may retain API data for 30 days, but not for model training purposes (see their terms and policies).
What the app does
Our example app provides two functions;- page summarisation and a space index organised around themes.
Summarisation functionality
It's often useful to provide a summary of a page at the top so readers can gain a quick overview without needing to read the full page. Our example app creates page summaries for you. The app declares a Confluence page byline item. When the byline item is opened, the app fetches the content of the page via the Confluence REST API. This content is then sent to the OpenAI API chat completions endpoint with a prompt requesting the content to be summarised. OpenAI returns a brief summary that the app presents. The app also presents a button to insert the summary at the top of the page, which is achieved by another call to the Confluence REST API.
Themed space index functionality
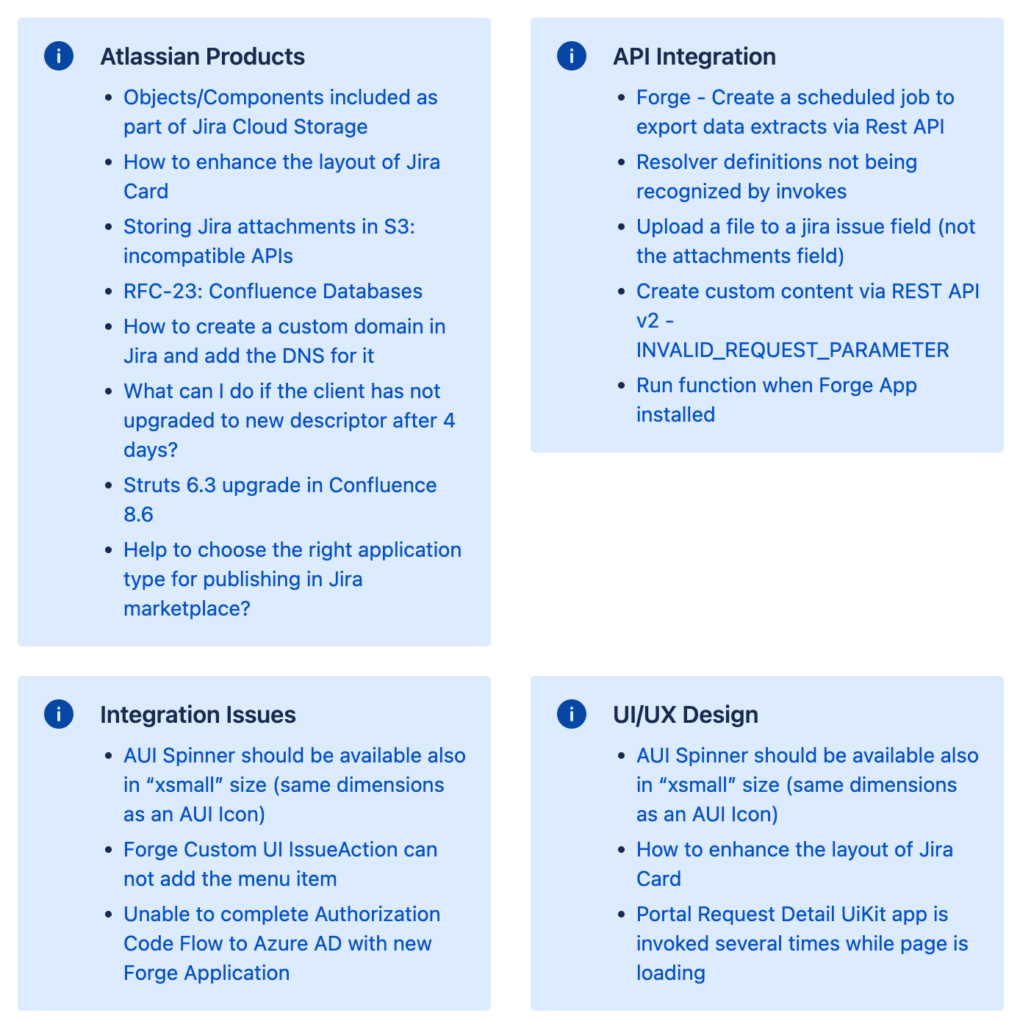
Confluence is a great tool for creating content, but it doesn't automatically organise it for you so it can be challenging to navigate content in a space. This is where AI can help. The app provides a Confluence space page that presents an index of the space where links to pages are grouped by theme. The app accomplishes this by calling the Confluence API to find the top-level pages in the space. It then analyzes the titles of the pages to identify themes and presents the links to the pages in panels, each related to a different theme. This feature makes navigating through the pages a breeze so you can easily find pages related to a specific theme.
Getting set up
It is assumed you already have a working Forge development environment. If not, visit this Forge getting started guide. The app was built using node 18.
Clone and build the example app
The example app is located in a GitHub repository at https://github.com/dugaldmorrow/forge-ai-basics. Once you clone the app, run the following commands in your shell (alternatively, you can swap the yarn commands for npm install commands and yarn build for npm run build):
cd [app-folder]
yarn
cd static/llm-ui
yarn
yarn build
cd ../..
OpenAI API key
The app uses the OpenAI API so you will need to create an OpenAI account and generate an API key. This key is used to authorize your application’s requests to OpenAI’s API. Refer to the OpenAI API instructions for more details. Once you have generated an OpenAI API key, set the API key in a Forge environment variable in your shell/terminal, making sure you are in the root directory of the app. Here is the command to do this:
forge variables set --encrypt OPEN_API_KEY your-key Note, Forge will automatically pick up environment variable values set using forge variables set from the development environment and use them when tunnelling so you will not need to call export FORGE_USER_VAR_OPEN_API_KEY=your-key as you previously would have. Just make sure you're using the latest Forge CLI.
Run the app
Although you've built the app and set the necessary environment variable, you can't run it until you've registered your own copy of the app using the forge register command, deployed it and installed it. Here are the commands for doing this:
forge register
forge deploy
forge install
Note, when prompted, select Confluence as the product to install the app in.
How the app works
App configuration
The app centralises its configuration functions in a file called config.ts:
/**
 * Set the OpenAPI API Key as follows:
 * forge variables set --encrypt OPEN_API_KEY your-key
 * export FORGE_USER_VAR_OPEN_API_KEY=your-key
 */
export const getOpenAPIKey = () => {
  return process.env.OPEN_API_KEY;
}

export const getOpenAPIModel = () => {
  return 'gpt-3.5-turbo';
  // return 'gpt-4';
}

export const getSummarisationTtlMillis = () => {
  // The cleanup of summarisation data is triggered via an async event and
  // the maximum delay async event execution is 900 seconds so this becomes
  // our maximum time to live (TTL) for cached summarisation values.
  return 900 * 1000;
}
Note, the model used by the app is hard coded to gpt-3.5-turbo, but you may wish to explore the results of other models such as gpt-4.
Two UIs, one static front end
The app utilises two extension points, content byline item and space page, to present UI in two types of places within the Confluence UI. Custom UI is used for both. In order to reduce the amount of front end code, both of these UIs are served from the same static front end code. This is achieved by the app manifest declaring one resource, with the arbitrary key of llm-ui, that both UI modules use. Here are the relevant app manifest snippets:
modules:
  confluence:spacePage:
    - key: themed-space-index
      resource: llm-ui
      ...
  confluence:contentBylineItem:
    - key: content-summariser
      resource: llm-ui
      ...
resources:
  - key: llm-ui
    path: static/llm-ui/build
The code determines which UI to render by inspecting the module from the context provided to the rendering function:
const render = async () => {
  const context = await view.getContext();
  const moduleKey = context.moduleKey;
  const renderedUI =
    moduleKey === 'content-summariser' ? <PageSummariserView /> :
      moduleKey === 'themed-space-index' ? <ThemedSpaceIndexView /> : null;
  ReactDOM.render(
    <React.StrictMode>
      {renderedUI}
    </React.StrictMode>,
    document.getElementById('root')
  );
}
render();
App UI and function interactions
Each of the app's UIs is configured with a Custom UI resolver that allows the app frontend to call the backend (Forge runtime). This configuration is contained in the following app manifest snippets:
  confluence:spacePage:
    - key: themed-space-index
      resource: llm-ui
      resolver:
        function: resolver-fn
      ...
  confluence:contentBylineItem:
    - key: content-summariser
      resource: llm-ui
      resolver:
        function: resolver-fn
      ...
  function:
    - key: resolver-fn
      handler: uiResolver.handler
In order to make a call from the Custom UI front ends, the app uses the invoke method.
Caching results
Since OpenAI API calls take a while to execute and can be costly, the app caches results in Forge storage. When a request from the front end is made to retrieve the AI generated content, the app first makes a call to the Forge Storage API to check if a cached result is available. Page summarisation cached results are only treated as being valid if the result was generated within a reasonable time prior to the request and if it was generated against the latest version of the page. Space index cache results are always treated as valid, but the UI makes the button allowing the regeneration of the space index quite prominent if the result was generated a fairly long time ago.
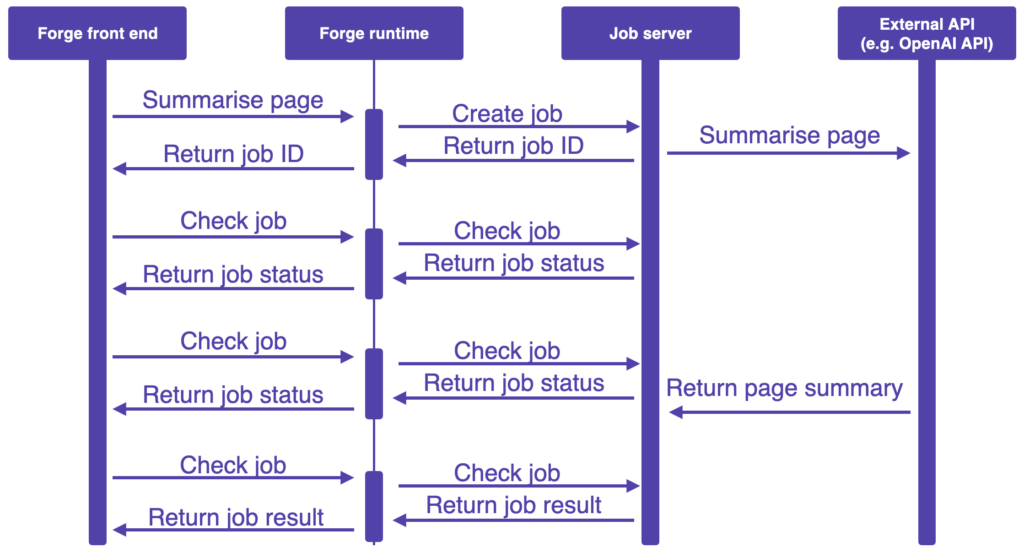
The following sequence diagram shows the key interactions behind two subsequent page summarisation requests:
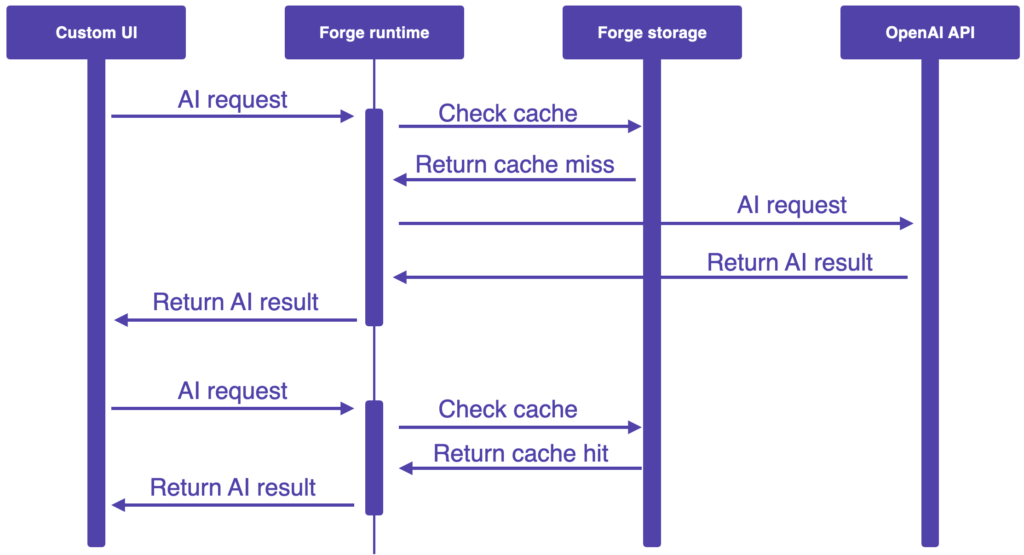
Note, for simplicity, the above sequence diagram omits calls to the Confluence API to retrieve page details which is necessary to determine the latest version of the page to determine if the cached result is valid.
Cache cleaning
Since there can be a lot of pages in Confluence, the page summarisation cached results are automatically deleted after a period of time. This alleviates the amount of data stored in Forge storage since apps are subject to storage quotas.
The app clears cached page summarisation results using the async events API. When a page summarisation result is returned from the OpenAI API, the result is stored in Forge storage and an event is scheduled with the delay retuned from getSummarisationTtlMillis (see config.ts). When the event fires, the cached result is removed from Forge storage. The following sequence diagram illustrates the key interactions:
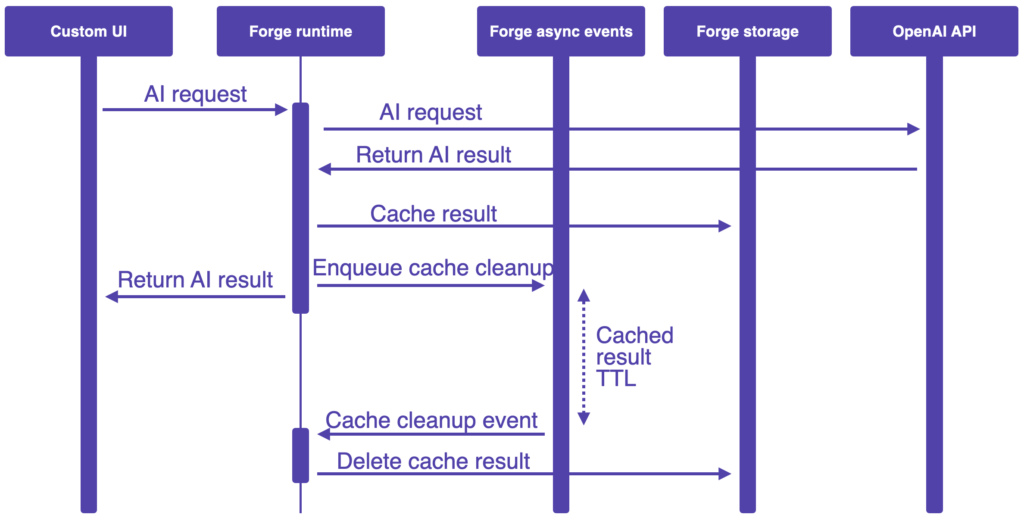
Each result is stored under a key with the format content-${contentId}. In order for the key to be constructed when the event is received, the content ID must be passed with the event. To see how this works in detail, view the code in storageCleanupQueueOps.ts and the invocation of pushCleanupEvent in contentSummariser.ts.
Invoking the OpenAI API
Both the page summarisation and space indexing is achieved by calling the chat completion endpoint with a prompt crafted from the context and operation being formed. The code making the API calls is contained in openAiUtil.ts. It simply involves a POST REST API call using the fetch method:
postChatCompletion = async (prompt: string): Promise<ChatCompletionResult> => {
    const choiceCount = 1;
    const url = `https://api.openai.com/v1/chat/completions`;
    const payload = {
      model: getOpenAPIModel(),
      n: choiceCount,
      messages: [{
        role: 'system',
        content: `You are a helpful assistant.`
      }, {
        role: 'user',
        content: prompt
      }]
    };
    const options: any = {
      method: 'POST',
      headers: {
        Authorization: `Bearer ${getOpenAPIKey()}`,
        'Content-Type': 'application/json',
      },
      redirect: 'follow',
      body: JSON.stringify(payload)
    };
    const response = await fetch(url, options);
    const result: ChatCompletionResult = {
      status: response.status,
      message: ''
    }
    if (response.status === 200) {
      const chatCompletion = await response.json() as ChatCompletion;
      // The information should all be in a single ChatCompletionChoice object because the
      // request specified this (see the n attribute in the payload above).
      const firstChoice = this._findFirstAssistantCompletionChoice(chatCompletion.choices);
      if (firstChoice) {
        result.message = firstChoice.message.content;
      } else {
        console.warn(`Chat completion response did not include any assistance choices.`);
        result.message = `AI response did not include any choices.`;
      }
    } else {
      const text = await response.text();
      result.message = text;
    }
    return result;
  }
In order for this to work, the app's manifest needs to declare the permission to communicate with the OpenAI AI:
 permissions:
  external:
    fetch:
      backend:
        - https://api.openai.com
The postChatCompletion method in openAiUtil.ts accepts a prompt argument and returns an object containing a status code representing the request status and a message that is either the generated AI message or an error message if the status is anything but 200 (HTTP success with content returned).
Page summarisation API calls
Page summarisation is achieved by calling the postChatCompletion method with a prompt with the following format:
I will provide the body of an Atlassian Confluence page with the title
"${page.title}" in Confluence's ${pageFormatName}. Please provide a description
(less than 100 words) of the page's content and purpose. Here is the page:
${pageContent}
In order to create the prompt, the page content must be retrieved by calling the get page by ID endpoint:
/wiki/api/v2/pages/${id}The ID of the page is determined from the context in which the call is being made.
Themed space index API calls
Creating a themed space index starts with calling the Confluence GET space endpoint with the query parameter to identify home page of the space (see getIdOfTopPageInSpace within confluenceUtil.ts):
/wiki/rest/api/space/${spaceKey}?expand=homepageWith the root page of the space identified, a query is made to the search content endpoint to search for top level content in the space.
/wiki/rest/api/search?cql=${cql} where cql is Confluence Query Language (CQL) as follows:
space = ${spaceKey} and type = "page" and parent = ${topPageId}If that search returns fewer than 10 pages, a second search is done with the CQL is modified to remove the parent = ${topPageId} clause so that more pages in the space are found. If the second search produces fewer than 10 results, an error response is returned and the UI will indicate that there is not enough content to create a themed space index. A possible enhancement to the app would involve presenting a simple non-themed index.
With pages in the space identified, a prompt can be created using the following format:
Group the following topics into themes with the results formatted as nested
bullet point lists where the outer list identifies the themes and the inner lists
identified the topics matching the themes and each theme is prefixed with "theme:"
and each topic is prefixed with "topic:"
* [page title 1]
* [page title 2]
* [page title N]
Preferably identify an even number of themes and ensure there are more than one
topic matching the majority of themes.
Note, the even page preference directive in the prompt is due to the UI being designed around the presentation of each theme in a panel half the width of the page so an odd number of themes would result in a dangling panel.
OpenAI returns the response with the following format:
Theme: [theme name]
* topic: [page title]
* topic: [page title]
* topic: [page title]
Theme: [theme name]
* topic: [page title]
* topic: [page title]
* topic: [page title]
...
The Theme: and topic: prefixes are used to parse the response.
Note, OpenAI doesn't respect the capitalization of the "theme:" and "topic:" directives in the prompt so the parsing is done in a case insensitive manner in case the behaviour of OpenAI changes in the future.
Using the openai library
Note, use version 3.3.0 of the openai library since version 4.x.x is incompatible with the Forge runtime.
Instead of calling the OpenAI API using the fetch method, you could choose to use the openai library. If you prefer this approach, here is some code to get you started, taking note of the tty polyfill hack.
import { Configuration, OpenAIApi } from 'openai';
import tty from 'tty';

const callOpenAI = async (prompt) => {
  // dirty hack - tty.isatty is not polyfilled in the Forge runtime,
  // but is called by a dependency of OpenAIApi Forge Runtime, so
  // let's polyfill it ourselves...
  tty.isatty = () => {
   return false
  };
  const configuration = new Configuration({
    apiKey: process.env.OPEN_API_SECRET,
  });
  const openai = new OpenAIApi(configuration);
  const chatCompletion = await openai.createChatCompletion({
    model: "gpt-3.5-turbo", // alternatively "gpt-4"
    messages: [{
      role: "user",
      content: prompt
    }]
  });
  const response = chatCompletion.data.choices[0].message.content;
  return response;
}
Permissions
Since the app makes quite a few types of interactions, it requires a range of permissions, including the external fetch permission in order to be able to call the OpenAI API as noted earlier. In addition, a number of permissions are required for the Custom UI rendering.
permissions:
  scopes:
    - storage:app
    - read:page:confluence
    - write:page:confluence
    - search:confluence
    - read:confluence-space.summary
  content:
    scripts:
      - unsafe-inline
      - unsafe-hashes
    styles:
      - unsafe-inline
  external:
    fetch:
      backend:
        - https://api.openai.com
Long running OpenAI API requests
The time it takes to execute an OpenAI API chat completion call can vary significantly and is highly dependent of what is being requested, i.e. the prompt. Page summarisation and theming a reasonable sized list of page titles has empirically shown to return results reasonably quickly, but you should be mindful when designing prompts for other kinds of AI tasks to avoid taking longer than the Forge runtime timeout of 25 seconds. For example, the following prompt will likely take longer:
Summarise each of the 20 most popular programming languages including origins,
industries of use, applications, pros and cons.
The reason this prompt is expensive and time consuming to run is that it takes the form of a 1 + n task prompt which leads to the generation of a large amount of content:
task that yields n results
for each result:
  perform a task
Note, it's possible that OpenAI may perform the tasks concurrently so the 1 + n task prompt form is not meant to imply it can estimate the overall duration with any accuracy, but it is useful for helping to recognise types of prompts that may lead to longer durations.
In order to achieve this in Forge, you could split the requests as indicated above and execute them separately then combine the results. There are two approaches to executing the requests separately:
- In a single Forge runtime invocation, send the separate results concurrently and use
Promise.allSettled()to gather the results. This could result in rate limiting and may be sensitive to extended query times depending on how OpenAI prioritises parallel requests from the same account. - Use the Forge async events API to execute the requests in multiple function invocations, passing a payload from one to another to accumulate the results. If the results need to be returned to a Custom UI front end, the final result would need to be stored in Forge storage and the custom UI front end would need to be polling to check for the availability of the results. This would result in a longer overall execution time and is likely to be more resilient at the cost of additional complexity.
An alternate approach that avoids needing to split the OpenAI API call involves creating a service that acts as a facade to the OpenAI API. This facade would return a jobID that represents the OpenAI API request. The jobID would be used in subsequent polling requests to retrieve the results. This service would need to authenticate and authorize requests to avoid it being abused.
Summary
This post provides a range of practical information to help developers build Forge apps providing AI capabilities. Forge provides a range of features and simplifies development and hosting so it's a great option for exploring AI development.
Fork the example app to get a head start on building your own AI app.