

Jira is a valuable tool for agile project management, allowing teams to streamline workflows, track issues, and collaborate effectively. Jira administrators are responsible for configuring and maintaining the platform to meet their organization’s specific needs. However, as demand for customized solutions grows, administrators may seek ways to enhance Jira even further and this is where the Forge platform comes into play.
What is Forge?
Forge is a serverless app development platform that enables administrators to customize Jira without worrying about app hosting, and multiple development environments (development, staging, production). Forge is secure by design, providing control over when and how data leaves the Atlassian cloud. As a FaaS platform, Forge takes care of authentication, identity, scaling, and tenancy, ensuring a secure and efficient experience. By using Forge, Jira administrators can focus on issue-solving and unique workflow design while leaving infrastructure, hosting, and scaling concerns to Atlassian.
First-time Forge builders
If it’s your first time using Forge to build apps in Jira, Atlassian provides comprehensive documentation and resources to help you get started with Forge development. To set up your development environment, follow this Getting Started guide.
What we'll build today
Jira users have unique ways of using the product, and we understand that some features may require custom solutions to meet their specific needs. In this blog post, we will explore how to use Forge to address the existing feature request for Custom fields for Project. In order to have a clear requirement, we'll focus on this specific issue comment:
Could you please revisit this request? For building and monitoring company KPIs we definitely need a new field in Project settings like Team Size or Project Size (numerical field to fill in #people).
To make this happen, we will be utilizing the following APIs and modules:
- Properties API to store project-specific field values
- ProjectSettingsPage UI kit component to render a page in Jira's project settings
- Different UI kit components to construct the project settings page's user interface
At the end of this blog, we will build a Forge app that adds a new item in the project settings sidebar that opens a new page containing a project custom field.

Step 1: Generate the Forge app template using Forge CLI
- In your command line, go to the directory where you want to create the app e.g.,
cd ~/Development - Run the command
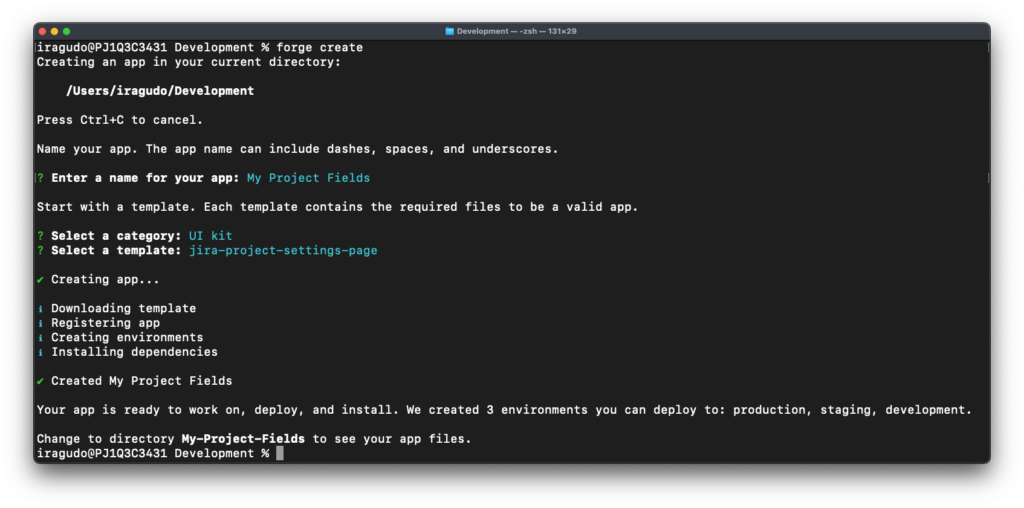
forge create - Enter a name for your app e.g.,
My Project Fields - Select the UI Kit category using the arrow keys.
- Select the jira-project-settings-page template from the options.
- A number of things happen after hitting the
return/enterkey: (1) the app template will be created, (2) the app will be registered, (3) development, staging, and production environments are created, and (4) the necessary dependencies were installed.
Step 2: Deploy and install the app template
The project created by calling forge create is already a functioning app that can be installed in your Jira Cloud instance. By following the steps below, you will be able to deploy, install, and view the app.
- Navigate to the newly created project directory.
- Call
forge deploy, this will package the app files and deploy the app to the development environment. - Install the app to your Jira Cloud instance by calling
forge install. This will prompt you to select a product (choose Jira), enter your instance's URL ({yourinstance}.atlassian.net), and will be asked to give consent to theread:mescope (selectyfor yes).
You've now successfully created and installed a Forge app on your Jira Cloud instance! The app should look something like this:
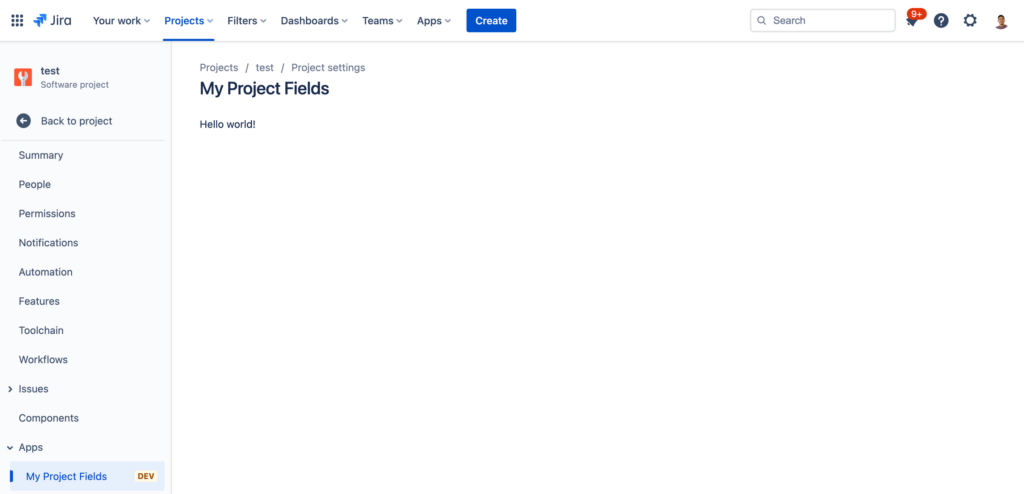
Building a Forge app is easy, am I right? Next up, we will enhance the user interface and add logic to read and store information in Jira.
Step 3: Add the necessary app scopes
The app we'll build needs to store and read information from Jira’s product context. These capabilities require specific permissions. Update the app's manifest.yml found in your project's root directory to include the following scopes.
permissions:
  scopes:
    - read:jira-work
    - manage:jira-project
Since we have updated the manifest file, we need to deploy these changes by calling forge deploy in your command line, followed by a forge install --upgrade to upgrade the current installation.
Step 4: Update the user interface
Calling forge create and building from a template provides us with a basic page that displays a text message saying "Hello world!". In this step, we'll make use of UI kit components to build our app's UI.
First, open the index.jsx file and update the existing import statement with the following. This will include the UI kit components as well as the UI kit hooks useProductContext and useState to allow us to read the product context and update the local state of the components, respectively.
import ForgeUI, { useProductContext, render, useState,
  ProjectSettingsPage, Form, TextField, Button, Text,
  ModalDialog, Table, Head, Row, Cell } from '@forge/ui';
Next, update the App() function to return a table with the UI components we need to display and edit the project field.
return (
  <Table>
    <Head>
      <Cell>
        <Text>Project Field</Text>
      </Cell>
      <Cell>
        <Text>Value</Text>
      </Cell>
      <Cell>
        <Text></Text>
      </Cell>
    </Head>
    <Row>
      <Cell>
        <Text>Team Size</Text>
      </Cell>
      <Cell>
        <Text>0 for now</Text>
      </Cell>
      <Cell>
        <Button text="Edit"/>
      </Cell>
    </Row>
  </Table>
);
Step 5: Implement the business logic
Import the Forge API package
The project custom field functions like your typical issue custom field i.e., it should be capable of storing and displaying the current value. Based on this requirement, we are going to import Forge’s Properties API which allows us to store data in key-value pairs for a specific project.
import { properties } from '@forge/api';We also need to install the Forge API package so that we can use it. In your command line, go to the project's root directory and run npm install @forge/api to install the package.
Instantiate the UI kit hooks
To call the project-specific Properties API, we need to have visibility as to which project the app is currently in. For this task, we would need to get the product context by calling useProductContext inside App().
For managing the local state of the data, we need to use the useState hook. We would be instantiating two hooks – one for the team size state, and the other for the modal dialog state – these will be used for editing and displaying the project field.
const App = () => {
  // Gets the product context when the app is loaded
  // This is where we'll get the projectKey of the
  // Project Settings Page we are currently in
  const context = useProductContext();

  // useState is a UI kit hook we use to manage the data in local state
  const [isModalOpen, setModalOpen] = useState(false);
  const [teamSize, setTeamSize] = useState(0);
  ...
Store the field value
First, we'll need to create an event handler to cater to the field edit use case. We'll use this event handler to read the form information and store it in Jira. Good thing that the Forge platform made it easier to store key-value pairs in product contexts, instead of calling the REST API, we can use Properties API's onJiraProject convenience method to store values in a project property.
// Edit form's onSubmit event handler
const onSubmit = async (formData) => {
  // Store the field value to a Jira project property
  // called `team-size`
  await properties.onJiraProject(context.platformContext.projectKey)
                  .set('team-size', formData.teamSize);

  // Update the local states
  setModalOpen(false);
  setTeamSize(formData.teamSize);
};
Next, update the UI to add the components we'll need to capture the project field value entry. Modify the last Cell in our existing Row component:
- Add the
onClickproperty in ourButtoncomponent to set the state of the modal totrue. - Create the
ModalDialogcomponent with aFormin it to capture the field value. - The
onSubmitproperty of theFormshould call the event handler we just created to save the field value.
<Row>
<Cell>
<Text>Team Size</Text>
</Cell>
<Cell>
<Text>0 for now</Text>
</Cell>
<Cell>
<Button text="Edit" onClick={async () => {
// Clicking the `Edit` button opens the modal
setModalOpen(true);
}}>
</Button>
{/* If the modal state is open, show the ModalDialog with our data entry form */}
{isModalOpen && (
<ModalDialog header="Edit team size" onClose={() => setModalOpen(false)}>
<Form onSubmit={onSubmit}>
<TextField name="teamSize" label="Team Size" type="number" autoComplete="off" />
</Form>
</ModalDialog>
)}
</Cell>
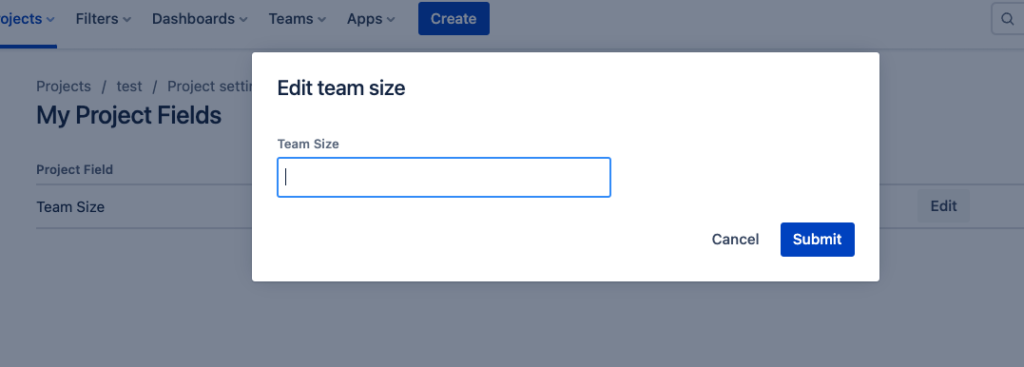
</Row>By clicking the Edit button in the table, it will open a modal dialog that will let us capture the field value.
Retrieve the field value
On the first load of the page, the value of teamSize is undefined as we only assign the local state when we click the form’s Submit button. In order to display the saved field value, we will change the initialValue argument passed to useState to retrieve the value we stored in the team-size project property.
// On initial load of the page, get the value from
// the project property `team-size`
const [teamSize, setTeamSize] = useState(
  async () => await properties
    .onJiraProject(context.platformContext.projectKey)
    .get('team-size')
);
Since we already have an updated value of teamSize, let's update the UI by replacing the static text in the cell from <Text>0 for now</Text> to <Text>{teamSize ? teamSize : 0}</Text>. This will dynamically display the teamSize if it is defined, if not, then that means the field has not been set and we default it to 0.
<Cell>
  <Text>Team Size</Text>
</Cell>
<Cell>
  <Text>{teamSize ? teamSize : 0}</Text>
</Cell>
And that's a wrap
With less than 70 lines of code, we are able to create a new project custom field. The UI was intentionally designed to use a Table in order to make it flexible enough to accommodate more project fields should there be a demand for it. Simply follow the pattern of using UI kit hooks, Properties API for Jira projects, and adding new rows and you will be on your way to creating new project fields.
If you are interested to see the whole project, you can visit this GitHub repository.
Forge is an incredibly powerful tool that opens up a new world of possibilities for Jira administrators and in-house developers alike, enabling them to enhance the platform’s capabilities and tailor it to their organization’s everyday bespoke needs. Whether you want to streamline your workflow, create advanced custom fields, integrate with external tools, or automate repetitive tasks, Forge has all the features you need to get started right away. So don’t hesitate – start building today and discover what amazing things you can achieve!