
We at Code Barrel are a bunch of former Atlassians hard at work developing rich new add-ons to help your team be as productive as possible! With this in mind we developed the NPS for JIRA add-on to enable your teams to get feedback directly from your customers, without ever having to leave JIRA or use a 3rd party tool.

In this blog, we wanted to share a brand new process that we used to develop this add-on in the hope that it will help other add-on developers in the ecosystem. We didn’t come up with this approach all by ourselves – full credit where it’s due: we were part of the JIRA Core at Atlassian when we pioneered this approach. It was so good that we decided to steal it use it as well.
This blog is part one of a two part blog series. In today’s blog we’ll look at the build configuration in depth. In part two we’ll cover development practices in detail. We’re going to go into a lot of technical detail in this blog. If you’re interested in a more product focused blog about how NPS for JIRA can help your team figure out what your customers really think, please let us know.
What’s wrong with the current way of developing add-ons?
Add-ons have been developed in more or less the same way for several years. They usually consist of:
- A data store on the server (maybe using AO or plugin settings)
- A webwork1 action defined in the
atlassian-plugin.xmlto expose this data (perhaps via a Velocity or Soy template)
- Or perhaps a more modern REST resource exposing this data
- Several JavaScript web-resources defined in the
atlassian-plugin.xmlconsuming this REST resource and rendering data on the client
The problem with this approach is that it makes developing an add-on for both server and cloud (Atlassian Connect) difficult. Certain constructs such as webwork1 actions are not available in a cloud add-on. Also most of the JavaScript that’s been written traditionally was heavily dependent on JIRA’s bundled JavaScript – something that would not work very well in a connect add-on (since the UI is rendered on a different server and domain).
To solve this problem we introduced a few guiding principles that need to be respected when developing an add-on:
- Data from the server can only be accessed via a well defined REST API. The JSON returned by this API should be standard so that it doesn’t matter wether it comes from a REST resource defined in a JIRA server
atlassian-plugin.xmlor from a REST resource in a standalone atlassian-connect server.
- The UI will be rendered solely on the client side, by standalone components independent of any JavaScript provided by JIRA.
In the next sections we’ll take an in-depth look at how this approach can be realized.
Tools of the trade
In theory, no specific tools are needed to to achieve our second goal of independent UI components. It is possible to write JavaScript components like this today. In practice, this is incredibly hard and requires far too much discipline from any dev team to be practical. This is why we need a few new practices and tools to make this possible.
First we will look at how we structure our project. From there we will look at configuration and dependencies. Then finally we will show you our dev loop and how we integrate with our build and test automations.
In order to ensure we separate out all our UI components from JIRA we need a new folder structure:
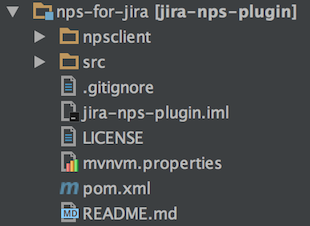
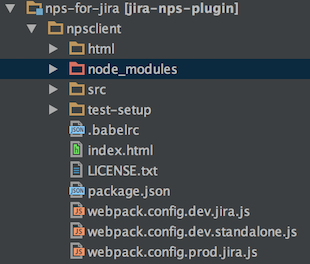
This is a standard JIRA server add-on using the plugin SDK. The only thing that’s different is the npsclient folder at the top level. This folder is excluded from the jar built in a standard Maven build. Looking at this in depth we can see that it’s a standard npm package:
This npm package could in fact also live outside of the plugin, but to keep things simple for now we include it directly in the add-on source repository.
Looking at the folder above you’ll notice that a few more tools are in use:
- Babel – A JavaScript compiler allowing us to use ES6 (and ES7 – object spreads!) features and down compile them to browser compatible ES5.
- Webpack – A JavaScript module bundler that allows us to implement our UI as a number of independent JS modules and then bundle them for inclusion in the final
atlassian-plugin.xmlas a standard web-resource. Webpack also offers a number of dev tools to make the inner loop fast!
Looking at the dependencies in package.json we notice that we’re using quite a few more tools:
"dependencies": {
  "babel-polyfill": "^6.7.4",
  "isomorphic-fetch": "^2.2.1",
  "react": "^15.0.0",
  "react-dom": "^15.0.0",
  "react-redux": "^4.4.5",
  "redux": "^3.5.1",
  "redux-thunk": "^2.0.1"
  //other dependencies not shown for brevity
},
"devDependencies": {
  "babel-core": "^6.2.0",
  "babel-loader": "^6.2.0",
  "babel-plugin-transform-object-rest-spread": "^6.6.5",
  "babel-preset-es2015": "^6.2.0",
  "babel-preset-react": "^6.2.0",
  "fetch-mock": "^4.4.0",
  "jsdom": "^7.2.2",
  "mocha": "^2.3.4",
  "react-addons-test-utils": "^15.0.0",
  "react-addons-update": "^15.0.0",
  "sinon": "^1.17.2",
  "webpack": "^1.12.14",
  "webpack-dev-server": "^1.14.1"
  //other dependencies not shown for brevity
}
In particular we’re using:
- React – If you haven’t heard about React by now and you’re in web development, you’re probably in the wrong profession. For us it’s a great way to build independent components fast.
- Redux – A simpler React flux alternative. More on how this gets used later.
- Polyfills – Such as babel-polyfill and isomorphic-fetch to fill gaps where browsers do not provide certain JavaScript APIs yet.
- Mocha – A JavaScript unit testing framework making it easy to write both synchronous and asynchronous tests. More on testing later.
- jsdom – A node js implementation of the DOM allowing us to run JavaScript unit tests without requiring a browser!
- Sinon – A popular JavaScript mocking framework in use in our unit tests.
The .babelrc configuration is quite simple:
{
    "presets": ["react", "es2015"],
    "plugins": ["transform-object-rest-spread"]
}
It instructs Babel that we are using React and ES6 and that we also want to use the new ES7 object spread operator. Babel can now down-compile this to ES5 (browser) compatible JavaScript code.
Development cycle
Now that we’ve looked at all the different tools in play, how do we hook them together? It all starts with the package.json in the npsclient folder. It contains a number of scripts to package the app for inclusion in JIRA:
"scripts": {
  "clean": "rm -rf node_modules/ lib/* npm-debug.log",
  "dev": "./node_modules/.bin/webpack-dev-server --config webpack.config.dev.standalone.js",
  "test": "./node_modules/.bin/mocha --compilers js:babel-core/register "./src/**/*test.js" --colors --require test-setup",
  "test-maven": "./node_modules/.bin/mocha --compilers js:babel-core/register "./src/**/*test.js" --no-colors --require test-setup --reporter mocha-multi --reporter-options spec=-,mocha-junit-reporter=-",
  "dev-jira": "./node_modules/.bin/webpack --config webpack.config.dev.jira.js --watch",
  "prod-jira": "./node_modules/.bin/webpack --config webpack.config.prod.jira.js"
},
The important script for development is the dev-jira script. To start developing the NPS add-on we simply launch JIRA in one console with the standard atlas-debug command. Then in a second console from the npsclient folder we launch npm run dev-jira.
This starts Webpack with the dev configuration and watches files for changes, so that any edits in our source code trigger a re-package to make the packaged JavaScript available to JIRA. Lets take a look at the Webpack configuration in detail:
require('webpack');
const path = require('path');
module.exports = {
  entry: {
    npsconfig: ['./src/polyfills.js', './src/entry/config/config.js'],
    npsreports: ['./src/polyfills.js', './src/entry/reports/reports.js'],
    npssurvey: ['./src/polyfills.js', './src/entry/survey/survey.js'],
  },
  output: {
    path: path.join(__dirname, '../src/main/resources/client'),
    filename: '[name].pack.js',
  },
  module: {
    loaders: [
      {
        test: /.js$/,
        loader: 'babel',
        query: {
          cacheDirectory: true,
        },
        exclude: /node_modules/,
      },
    ],
  },
  plugins: [],
  externals: {
    i18nStrings: 'require("jira/nps/i18n")',
  },
};
There’s a number of things going on here:
- We define three entry points: That’s Webpack speak for three packages we want to create based on the entries specified
- Babel loader: This simply hooks the babel compiler into the Webpack build to down-compile our JavaScript using the options we previously defined in
.babelrc
- An external
i18nStringsmodule: We’ll cover i18n in more detail in part two
How do we hook all of this up with the atlassian-plugin.xml? Simple:
<web-resource key="nps-survey-embeddable-pack">
    <resource location="/client/npssurvey.pack.js" name="npssurvey.js" type="download"/>
</web-resource>
Webpack bundles our external JavaScript into the src/main/resources/client folder inside our Atlassian plugin where we can then simply declare it as a standard web-resource in the atlassian-plugin.xml.
If we make a change in the npm module, the Webpack process we started earlier will automatically rebundle the *.pack.js file and since we’re running in dev mode, the Atlassian plugin SDK will automatically load the file from disk when we reload the browser. *In practice this means our dev loop is ‘change file’ → ‘refresh browser’*.
Integration with Maven
The final jar file we release is built with Maven. Maven is needed to compile our Java source files and to bundle the plugin correctly with the maven-jira-plugin. This build now needs to also run the npm Webpack build to ensure we bundle the npm JavaScript resources in our plugin jar.
To achieve this, simply add the following maven-exec-plugin definition to build → plugins in the Maven pom.xml file:
<plugin>
    <groupId>org.codehaus.mojo</groupId>
    <artifactId>exec-maven-plugin</artifactId>
    <version>1.4.0</version>
    <executions>
        <execution>
            <id>exec-npm-install</id>
            <phase>initialize</phase>
            <configuration>
                <workingDirectory>./npsclient</workingDirectory>
                <executable>npm</executable>
                <arguments>
                    <argument>install</argument>
                </arguments>
                <skip>${skipNpm}</skip>
            </configuration>
            <goals>
                <goal>exec</goal>
            </goals>
        </execution>
        <execution>
            <id>exec-npm-build</id>
            <phase>generate-resources</phase>
            <configuration>
                <workingDirectory>./npsclient</workingDirectory>
                <executable>npm</executable>
                <arguments>
                    <argument>run</argument>
                    <argument>prod-jira</argument>
                </arguments>
                <skip>${skipNpm}</skip>
            </configuration>
            <goals>
                <goal>exec</goal>
            </goals>
        </execution>
        <execution>
            <id>exec-npm-tests</id>
            <phase>test</phase>
            <configuration>
                <workingDirectory>./npsclient</workingDirectory>
                <executable>npm</executable>
                <arguments>
                    <argument>run</argument>
                    <argument>test-maven</argument>
                </arguments>
                <environmentVariables>
                    <MOCHA_FILE>${project.build.directory}/surefire-reports/TEST-mochajsTest.xml</MOCHA_FILE>
                </environmentVariables>
                <skip>${skipTests}</skip>
            </configuration>
            <goals>
                <goal>exec</goal>
            </goals>
        </execution>
    </executions>
</plugin>
This does a few things:
- When the Maven build is initialized it will run
npm installto download all npm dependencies
- When generating sources, it will run
npm run prod-jirawhich runs a slightly different Webpack configuration that will also minify our final JavaScript packages.
- Finally we also integrate with the test phase of maven and run the `npm run tests-maven` goal which will invoke our JavaScript unit tests and produce a junit report that can be parsed by CI servers like Bamboo. We’ll cover testing in more detail in part two.
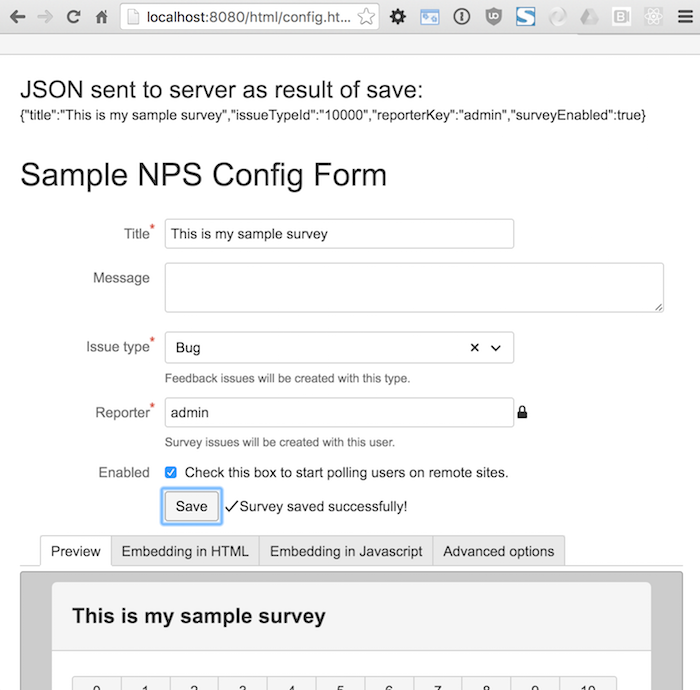
Standalone dev
We mentioned earlier that one of our guiding principles is to develop components that are standalone from JIRA. Webpack once again makes this easy with its dev server. By simply running the dev script defined in package.json via npm run dev we can run a standalone version of the npm module and test the client outside of JIRA. The Webpack dev server starts up incredibly fast and auto-reloads changes in the browser! Here’s an example of the config form React component running in the standalone Webpack dev server version:
That’s a configuration wrap!
We’ve covered a lot so far. We’ve looked at what’s wrong with the current approach of developing add-ons, outlined guiding principles for how to fix these problems and covered how the structure, tools and build of our add-on works to help us achieve these principles.
In part two of this blog series we’ll get into the meat of how things work: We’ll take an in-depth look at how some of the new components are implemented, how we test and internationalise them, and how we apply Redux to more complex parts of our app! Thanks for reading – we hope you found this useful and please let us know your thoughts or suggestions in the comments below!