
In Atlassian’s Kubernetes platform team, we’re working to bring the existing Kubernetes clusters under one team’s management; to arrive at some standard tooling, build processes, and workflow to build the Kubernetes clusters that are running internal workloads. This is the result.
We’ve spent a lot of time trying to find a workflow and dev process that would allow us to use DevOps concepts at the same time as we make sure that we do everything as close to the right way as possible.
The core part of this is a workflow that we call BDDA (pronounced like ‘Buddha’) – for “Build-Diff,Deploy-Apply”.
How we arrived at BDDA
As we started working on consolidating the existing Kubernetes clusters that had started springing up inside Atlassian, we decided that our environments had three goals:
- Ensure that we can reprovision things as easily as possible (preferably reasonably quickly as well)
- Uses declarative configuration rather than imperative
- Allow us to use automated testing, with all relevant information stored in a central repo
To explain further:
Ease of reprovisioning
We want to move as far as possible towards having our infrastructure be cattle, not pets. We weren’t sure the extent to which we would be able to make the compute underlying a Kubernetes cluster immutable, but the aim was to head as far down that road as we could. The high-level goal we used to help with this was that it needed to be easy to tear down a cluster and rebuild it from scratch.
Declarative configuration
We believe that the declarative configuration model for config management is a better match for the core Kubernetes concepts – the reconciliation loop at the heart of Kubernetes is built around the idea of declaring the desired state of things and then waiting for the system to bring the world into line with the desired state.
We also believe that declarative configuration tools tend to gravitate to solving problems by including the solution in the upstream tools, as opposed to a set of steps inside a private repo somewhere. That said, we do use imperative tools where it makes sense.
Automated testing
We want to eliminate manual ‘Is this working?’ steps and lessen the chances of breaking changes making it to production. The best way to do that is to use the advances in CI/CD to run automated testing as part of our builds, using a dedicated tool. We’re using Atlassian’s Bamboo tool, which also has the side effect of giving us a bunch of compliance ticks for free. (How this is handled internally is a whole different story, that should be told by someone who knows it better.)
What is BDDA?
The key insight we had was that, for infrastructure, a ‘build’ can correspond to the process of generating a diff between what is in the config repo and what is running on prod, storing that diff in the repo, then checking that diff does what’s expected in some way, and Deployment is applying the config and removing the diff for that environment.
There are two big advantages to this approach:
- Any differences between the current config and the destination infrastructure are always present in the repo, in a human readable format
- The presence of a diff indicates that the environment has undeployed changes
There are, of course, disadvantages too:
- Each engineer working on the repo needs their own dev environment to test their changes in for branch builds. So you need to be able to absorb the cost to set up multiple dev environments, in tooling, time and money.
- Complexities around the branch/merge process have meant that we have switched from keeping the terraform state inside the repo to using the s3 remote state storage that’s built into terraform.
How the workflow actually… flows
As outlined in our other post, we break up our infrastructure into three layers:
- Base AWS config (VPCs, subnets, and the like) – called the FLAG. This is built using Terraform.
- Compute config (everything required to present an unconfigured Kubernetes API) – called the KARR. Also built with terraform.
- Kubernetes config (everything that is applied to the Kubernetes API to make it a KITT cluster) – called the Goliath. What we use for this layer requires a little bit more explanation.
We would prefer to use Helm for the Kubernetes layer, and have a workflow all ready, using helm-diff, but it is currently blocked on Helm issue #1918 – turns out you can use the Tiller from inside the cluster to bypass all the RBAC controls we’ve implemented. So, for now, we’ve done this using Ansible’s templating, and using kube-diff to generate the diffs. As soon as that issue is resolved, however, we will switch to Helm.
The configuration for each of these layers is stored in a separate repo, but builds for each of the layers involve building the entire layer cake – to check for upstream effects of changes.
This diagram will hopefully help explain:
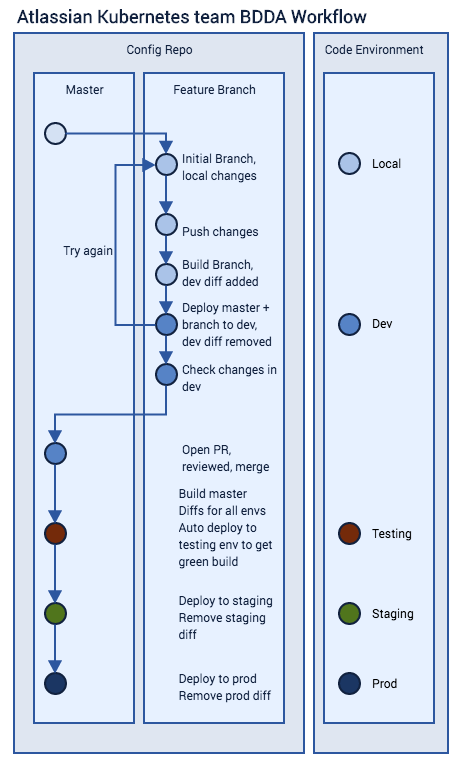
The workflow works like this:
- Clone or pull the latest master
- Branch for your changes.
- Pick an available dev environment and let the team know via chat
- Make your changes and push to your branch
- Head to the branch build Bamboo Server
- Build from your branch. Bamboo will commit the Terraform Plan/kube-diff to your branch
- Head to the internal Bitbucket Server (or pull your branch), and check the commit made by the Bamboo agent to your branch.
- The last lines of “changes.txt” in your Dev environment directory tells you what Terraform/Ansible will “add/change/destroy”
- Go back to branch build Bamboo
- Promote the latest master release to Dev environment you picked to sync it with master, using your Dev’s Bamboo deployment project
- Deploy your changes to your Dev creating a new release from your branch build (“Plan Branch”)
- Test your changes in your Dev, if it doesn’t work, try again
- Raise a PR and get it approved
- Merge to master
- This will trigger an Automated Release Test of the whole kitt stack (flag/karr/goliath)
- Build Plans in Bamboo are: Pre Deployment Verification FLAG/KARR/GOLIATH
- Once the Pre Deployment Verification plan completes you can build from master
- Head to SOX-compliant Bamboo
- Build from master. Bamboo will commit the Terraform Plan to git
- Head to the internal Bitbucket Server, and check the commit made by the Bamboo agent to your branch, as before
- Deploy your change creating a new release in Staging
- Deploy your change creating a new release in Prod
Conclusion
So far, we’ve found this workflow to be great for our internal dev speed and completely compatible with our compliance regime, while meeting the original three goals: ease of re-provisioning, declarative config, and incorporates automated testing.
I’d be very interested to hear thoughts from other people doing similar (or different) things.
That said, if you would like to do something like this yourself, my recommendations would be:
- Think carefully about how to layer your solution: There should definitely be a layer boundary at the ‘initial Kubernetes API server’, but how many layers you put on top of/below that boundary will depend on your use case.
- Think carefully about how you define an environment in your end platform, as this will have implications for how you lay out your repo.: You will need to reflect whatever hierarchy you choose in multiple places – for storing the actual config, for storing the diffs, and for storing the current/previous/next state somewhere.