I’ll show you the following basic JIRA Software scenario:
- Creating a project.
- Adding issues to our project.
- Creating a first sprint.
- Adding issues to our first sprint.
- Starting our first sprint.
- Moving issues through the workflow.
- Finishing our first sprint.
Warning: To use the JIRA Software REST API for anything other than reading information you’ll need to be authenticated, even if you can browse the project anonymously!
For more information about authenticating using the REST API take a look in our documentation.
- Creating a project
Let’s start by creating a project called ‘REST API Example Project’.
curl -u admin -H "Content-Type: application/json" -X POST -d '{
    "key": "REST",
    "name": "REST API Example Project",
    "projectTypeKey": "Software",
    "projectTemplateKey": "com.pyxis.greenhopper.jira:gh-scrum-template",
    "description": "REST API Example Project description",
    "lead": "admin",
    "url": "https://developer.atlassian.com",
    "assigneeType": "PROJECT_LEAD"
}' https://tip-of-the-week.atlassian.net/rest/api/2/project | python -m json.tool
As you can see we are piping the JSON to json.tool to get nicely formatted JSON. I explained this usage in another Tip of the Week: Making JSON readable on the command-line.
We get the following JSON reply:
{
 "self":"https://tip-of-the-week.atlassian.net/rest/api/2/project/10000",
 "id":10000,
 "key":"REST"
}
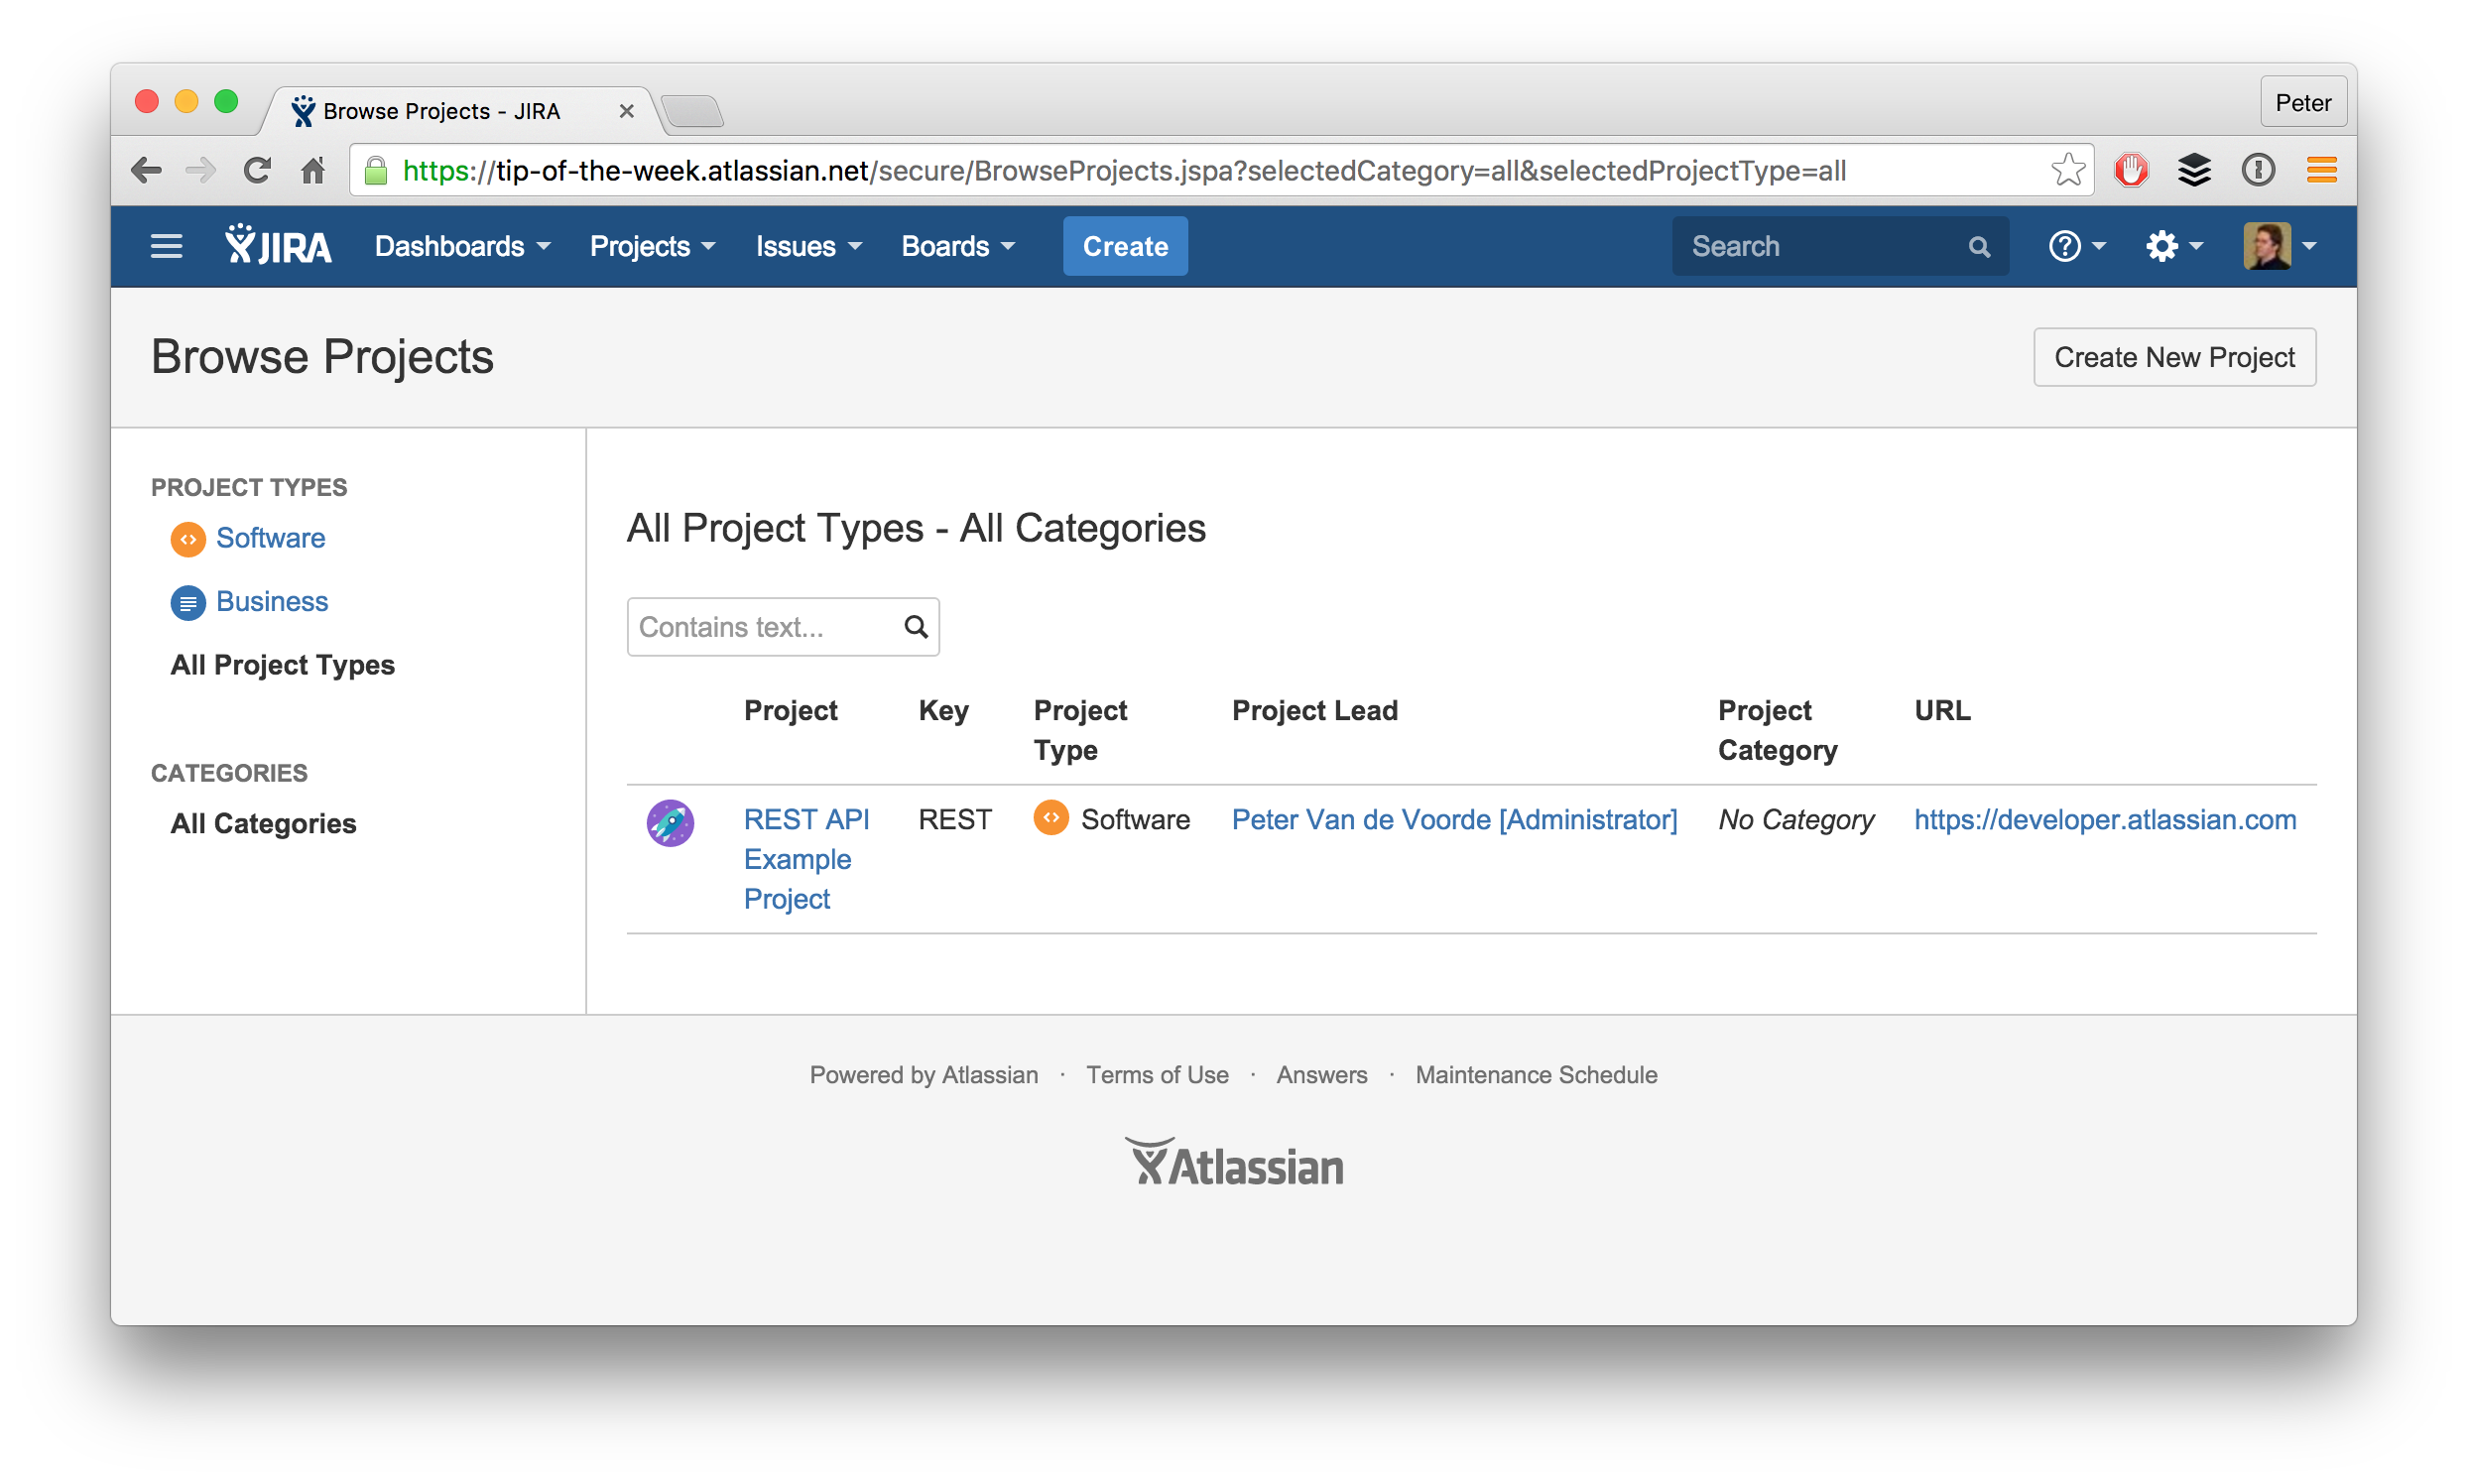
Remember the project id, we’ll need it for our next steps. And here you can see our project in JIRA Software:
- Adding issues to our project
Let’s add 3 issues for this example:
curl -u admin -H "Content-Type: application/json" -X POST -d '{
    "issueUpdates": [
        {
            "fields": {
                "project": {
                    "id": "10000"
                },
                "summary": "REST API Example Task 1",
                "issuetype": {
                    "id": "10002"
                },
                "assignee": {
                    "name": "admin"
                },
                "reporter": {
                    "name": "admin"
                },
                "priority": {
                    "id": "1"
                },
                "description": "This is an example task created through the REST API."
            }
        },
        {
            "fields": {
                "project": {
                    "id": "10000"
                },
                "summary": "REST API Example Task 2",
                "issuetype": {
                    "id": "10002"
                },
                "assignee": {
                    "name": "admin"
                },
                "reporter": {
                    "name": "admin"
                },
                "priority": {
                    "id": "2"
                },
                "description": "This is an example task created through the REST API."
            }
        },
        {
            "fields": {
                "project": {
                    "id": "10000"
                },
                "summary": "REST API Example Task 3",
                "issuetype": {
                    "id": "10002"
                },
                "assignee": {
                    "name": "admin"
                },
                "reporter": {
                    "name": "admin"
                },
                "priority": {
                    "id": "3"
                },
                "description": "This is an example task created through the REST API."
            }
        }
    ]
}' https://tip-of-the-week.atlassian.net/rest/api/2/issue/bulk | python -m json.tool
And JIRA Software in combination with json.tool returns us this nice JSON:
{
 "errors": [],
 "issues": [
     {
         "id": "10000",
         "key": "REST-1",
         "self": "https://tip-of-the-week.atlassian.net/rest/api/2/issue/10000"
     },
     {
         "id": "10001",
         "key": "REST-2",
         "self": "https://tip-of-the-week.atlassian.net/rest/api/2/issue/10001"
     },
     {
         "id": "10002",
         "key": "REST-3",
         "self": "https://tip-of-the-week.atlassian.net/rest/api/2/issue/10002"
     }
     ]
 }
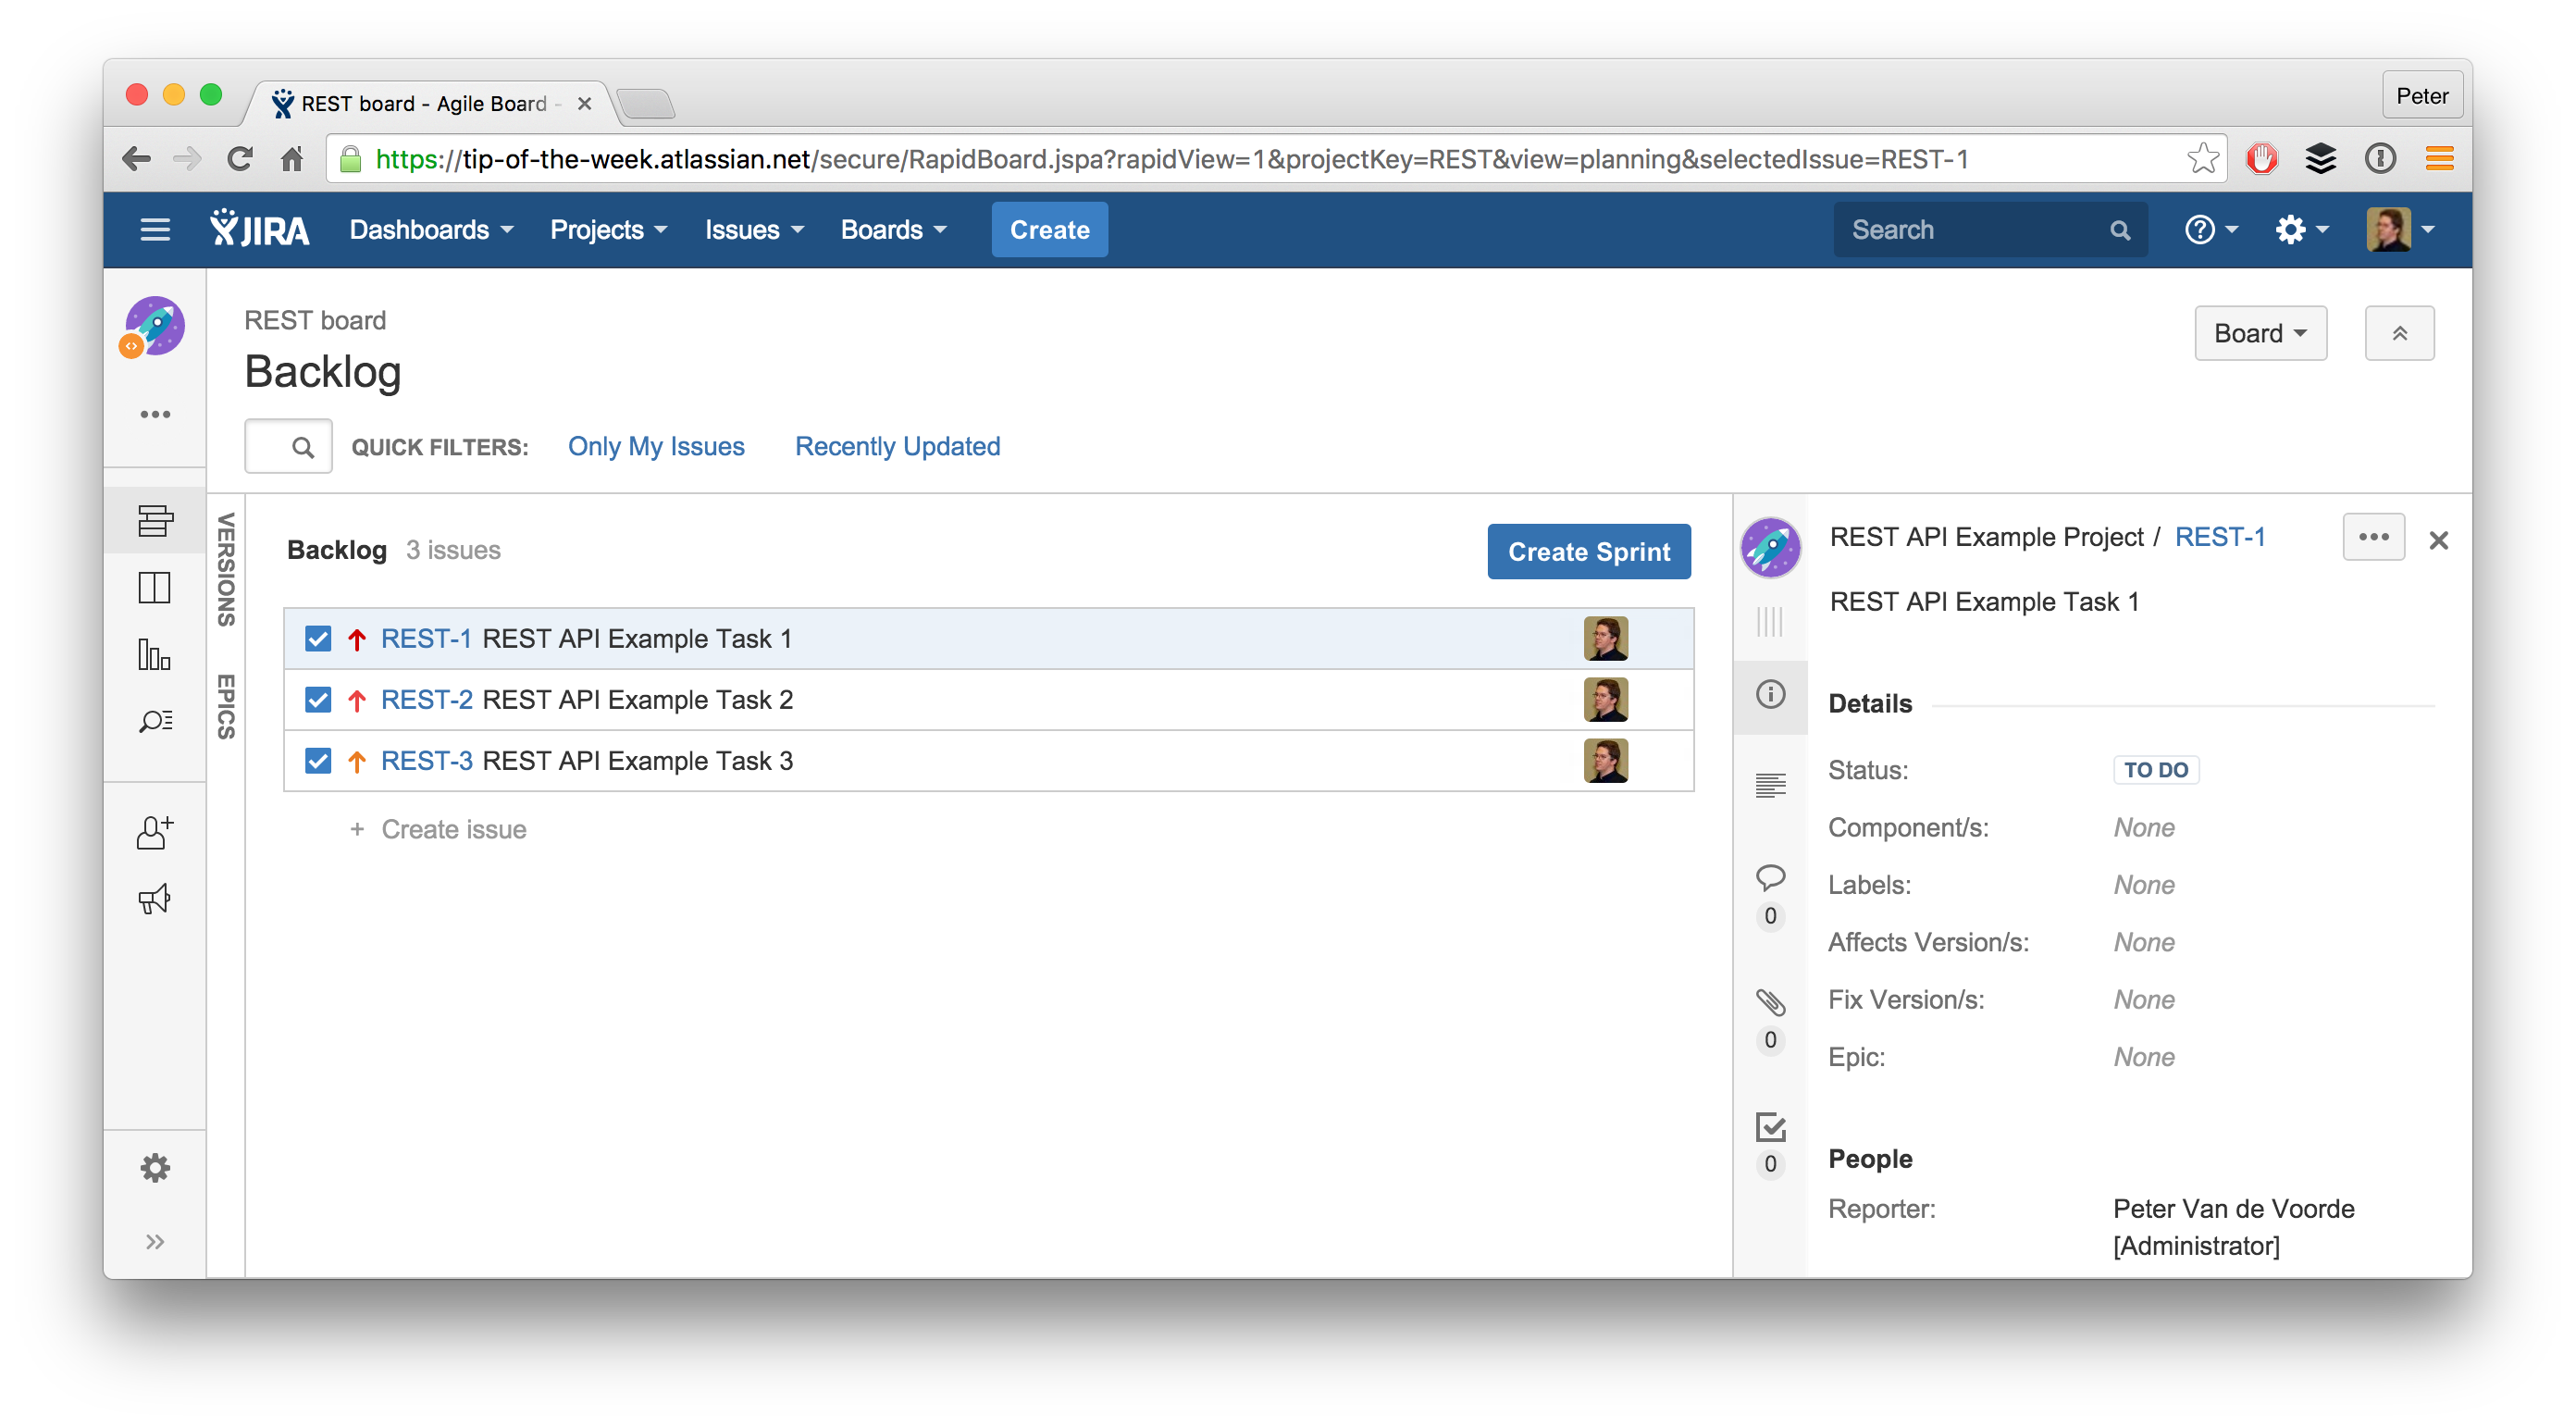
And here we can see those 3 issues in our product backlog in JIRA Software:
- Creating a first sprint
Now we’ll create a first sprint:
curl -u admin -H "Content-Type: application/json" -X POST -d '{
    "name": "Tip of the Week Sprint 1",
    "startDate": "2015-12-04T15:22:00.000+10:00",
    "endDate": "2015-12-11T01:22:00.000+10:00",
    "originBoardId": 1
}' https://tip-of-the-week.atlassian.net/rest/agile/1.0/sprint | python -m json.tool
And the following JSON is returned:
{
   "endDate": "2015-12-10T16:22:00.000+01:00",
   "id": 1,
   "name": "Tip of the Week Sprint 1",
   "originBoardId": 1,
   "self": "https://tip-of-the-week.atlassian.net/rest/agile/1.0/sprint/1",
   "startDate": "2015-12-04T06:22:00.000+01:00",
   "state": "future"
}
Remember the id, we’ll need to use this in the following steps.
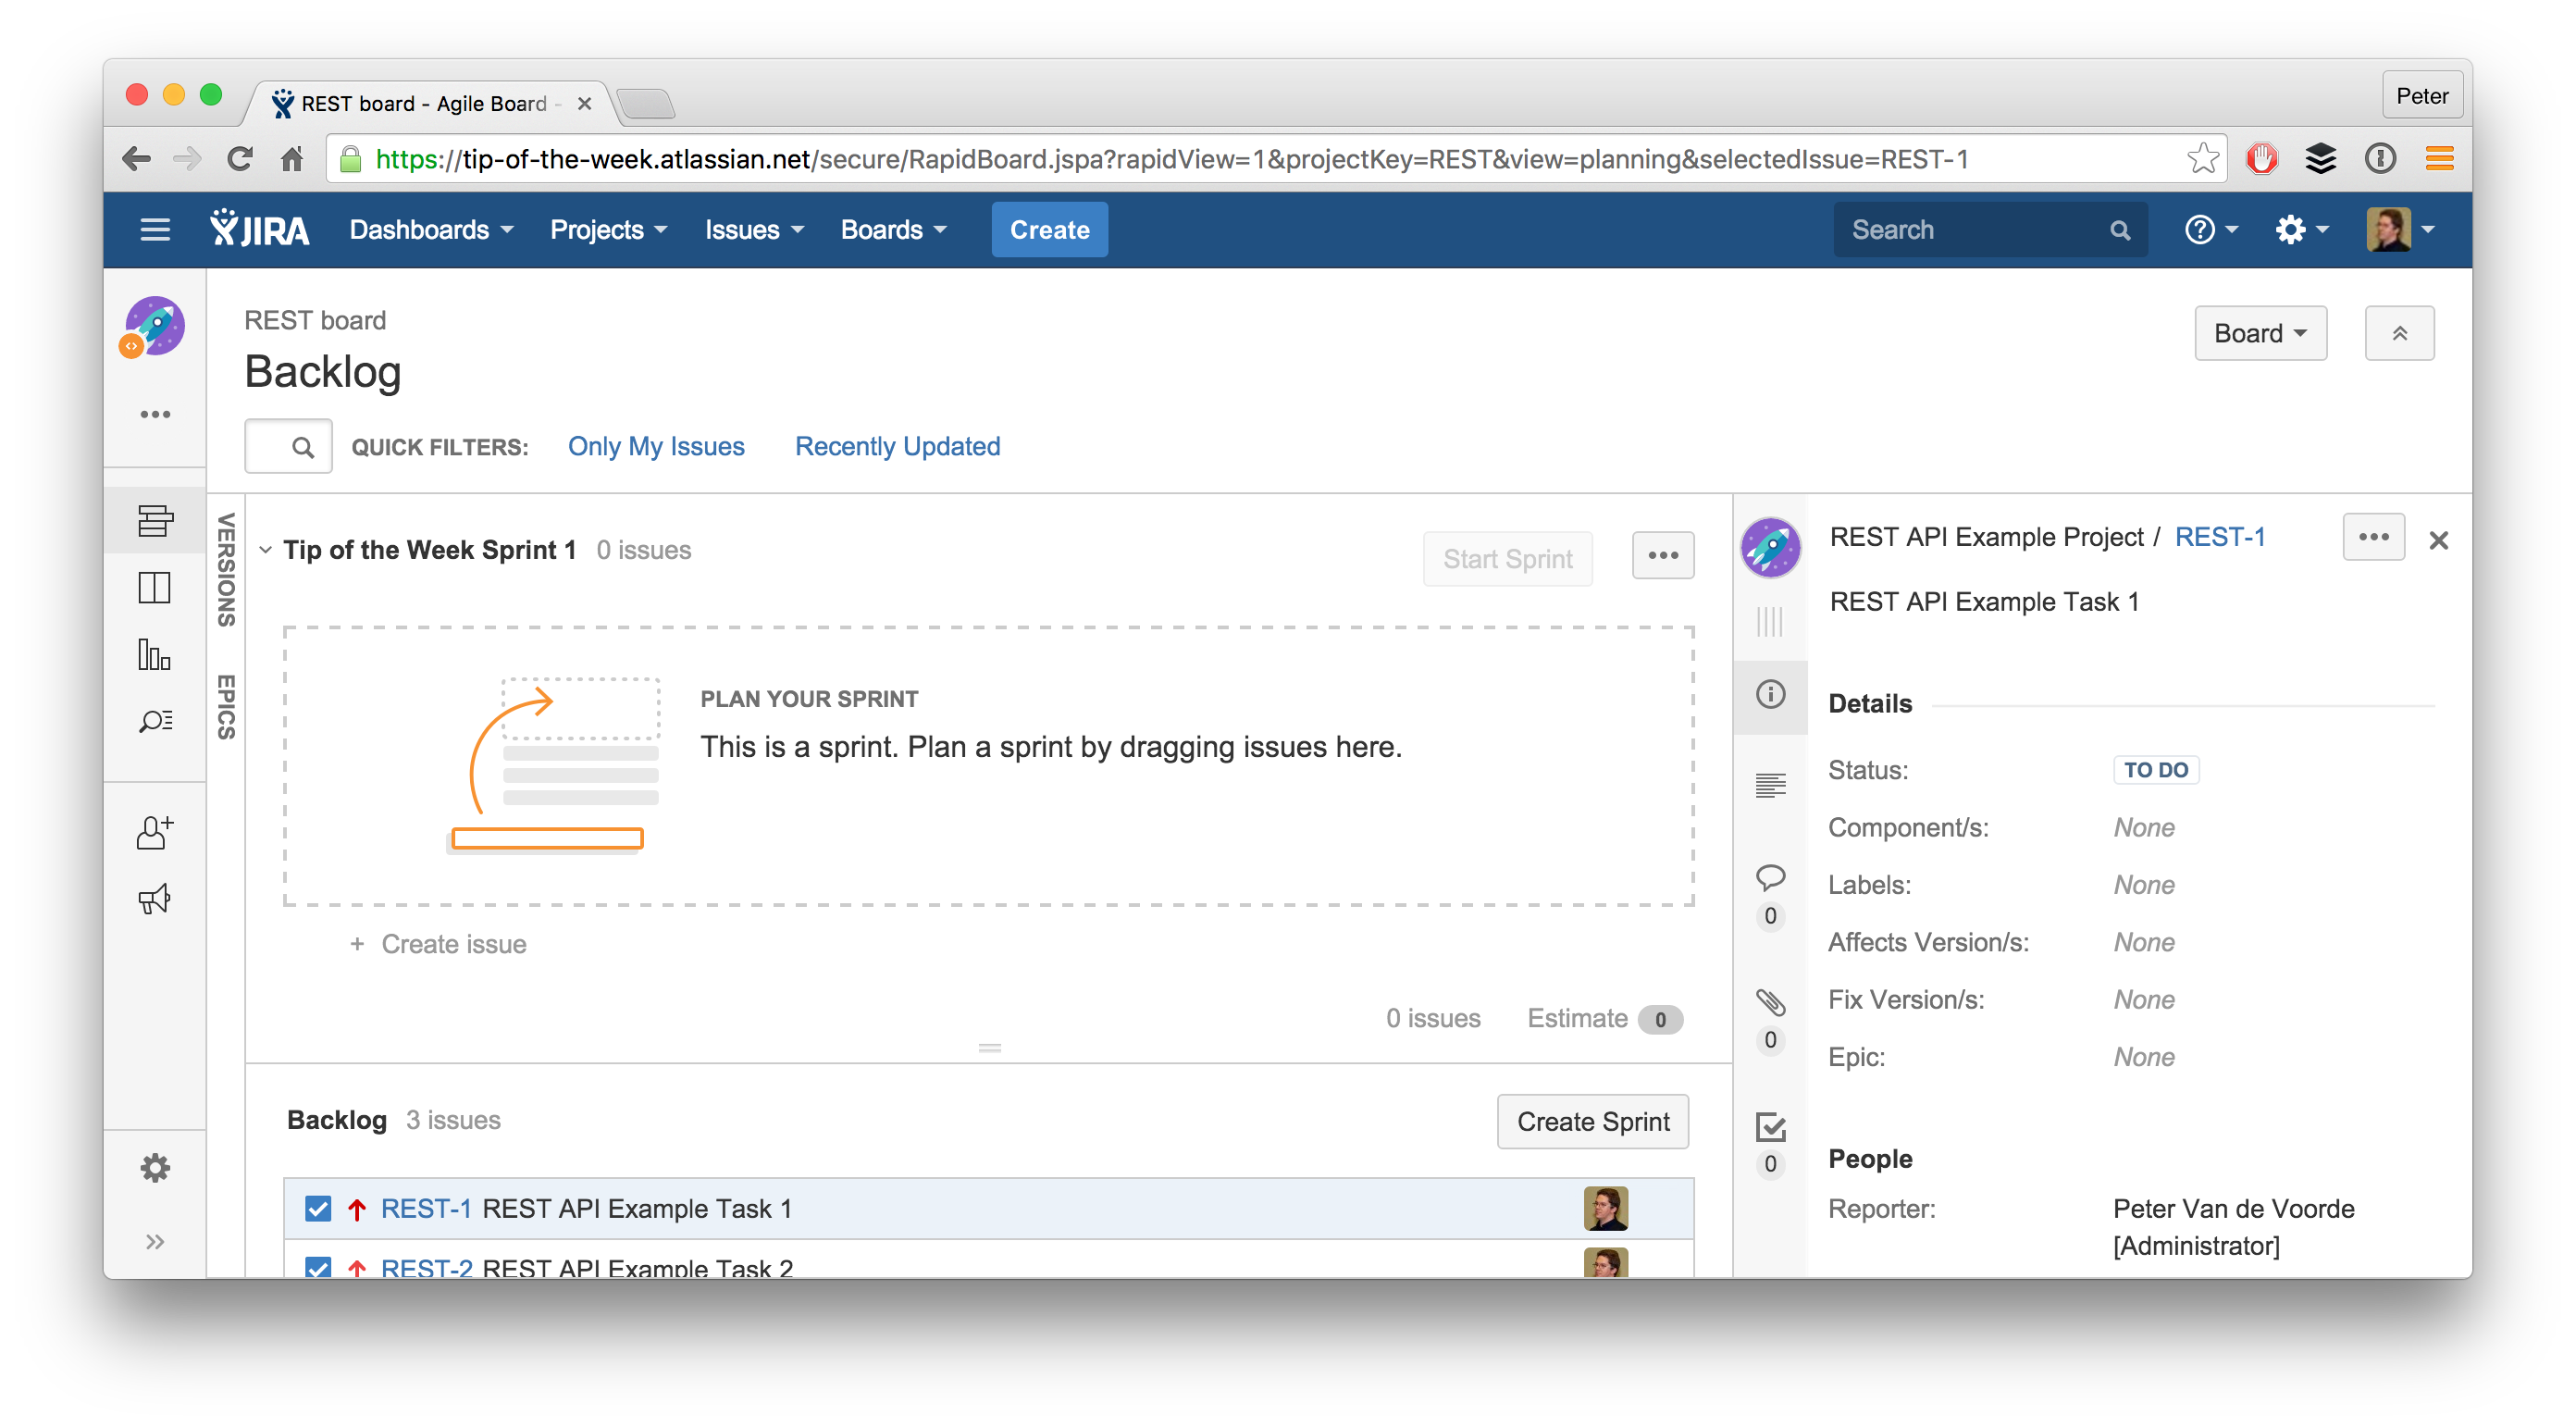
Our sprint has been nicely created on our Scrum board:
- Adding issues to our first sprint
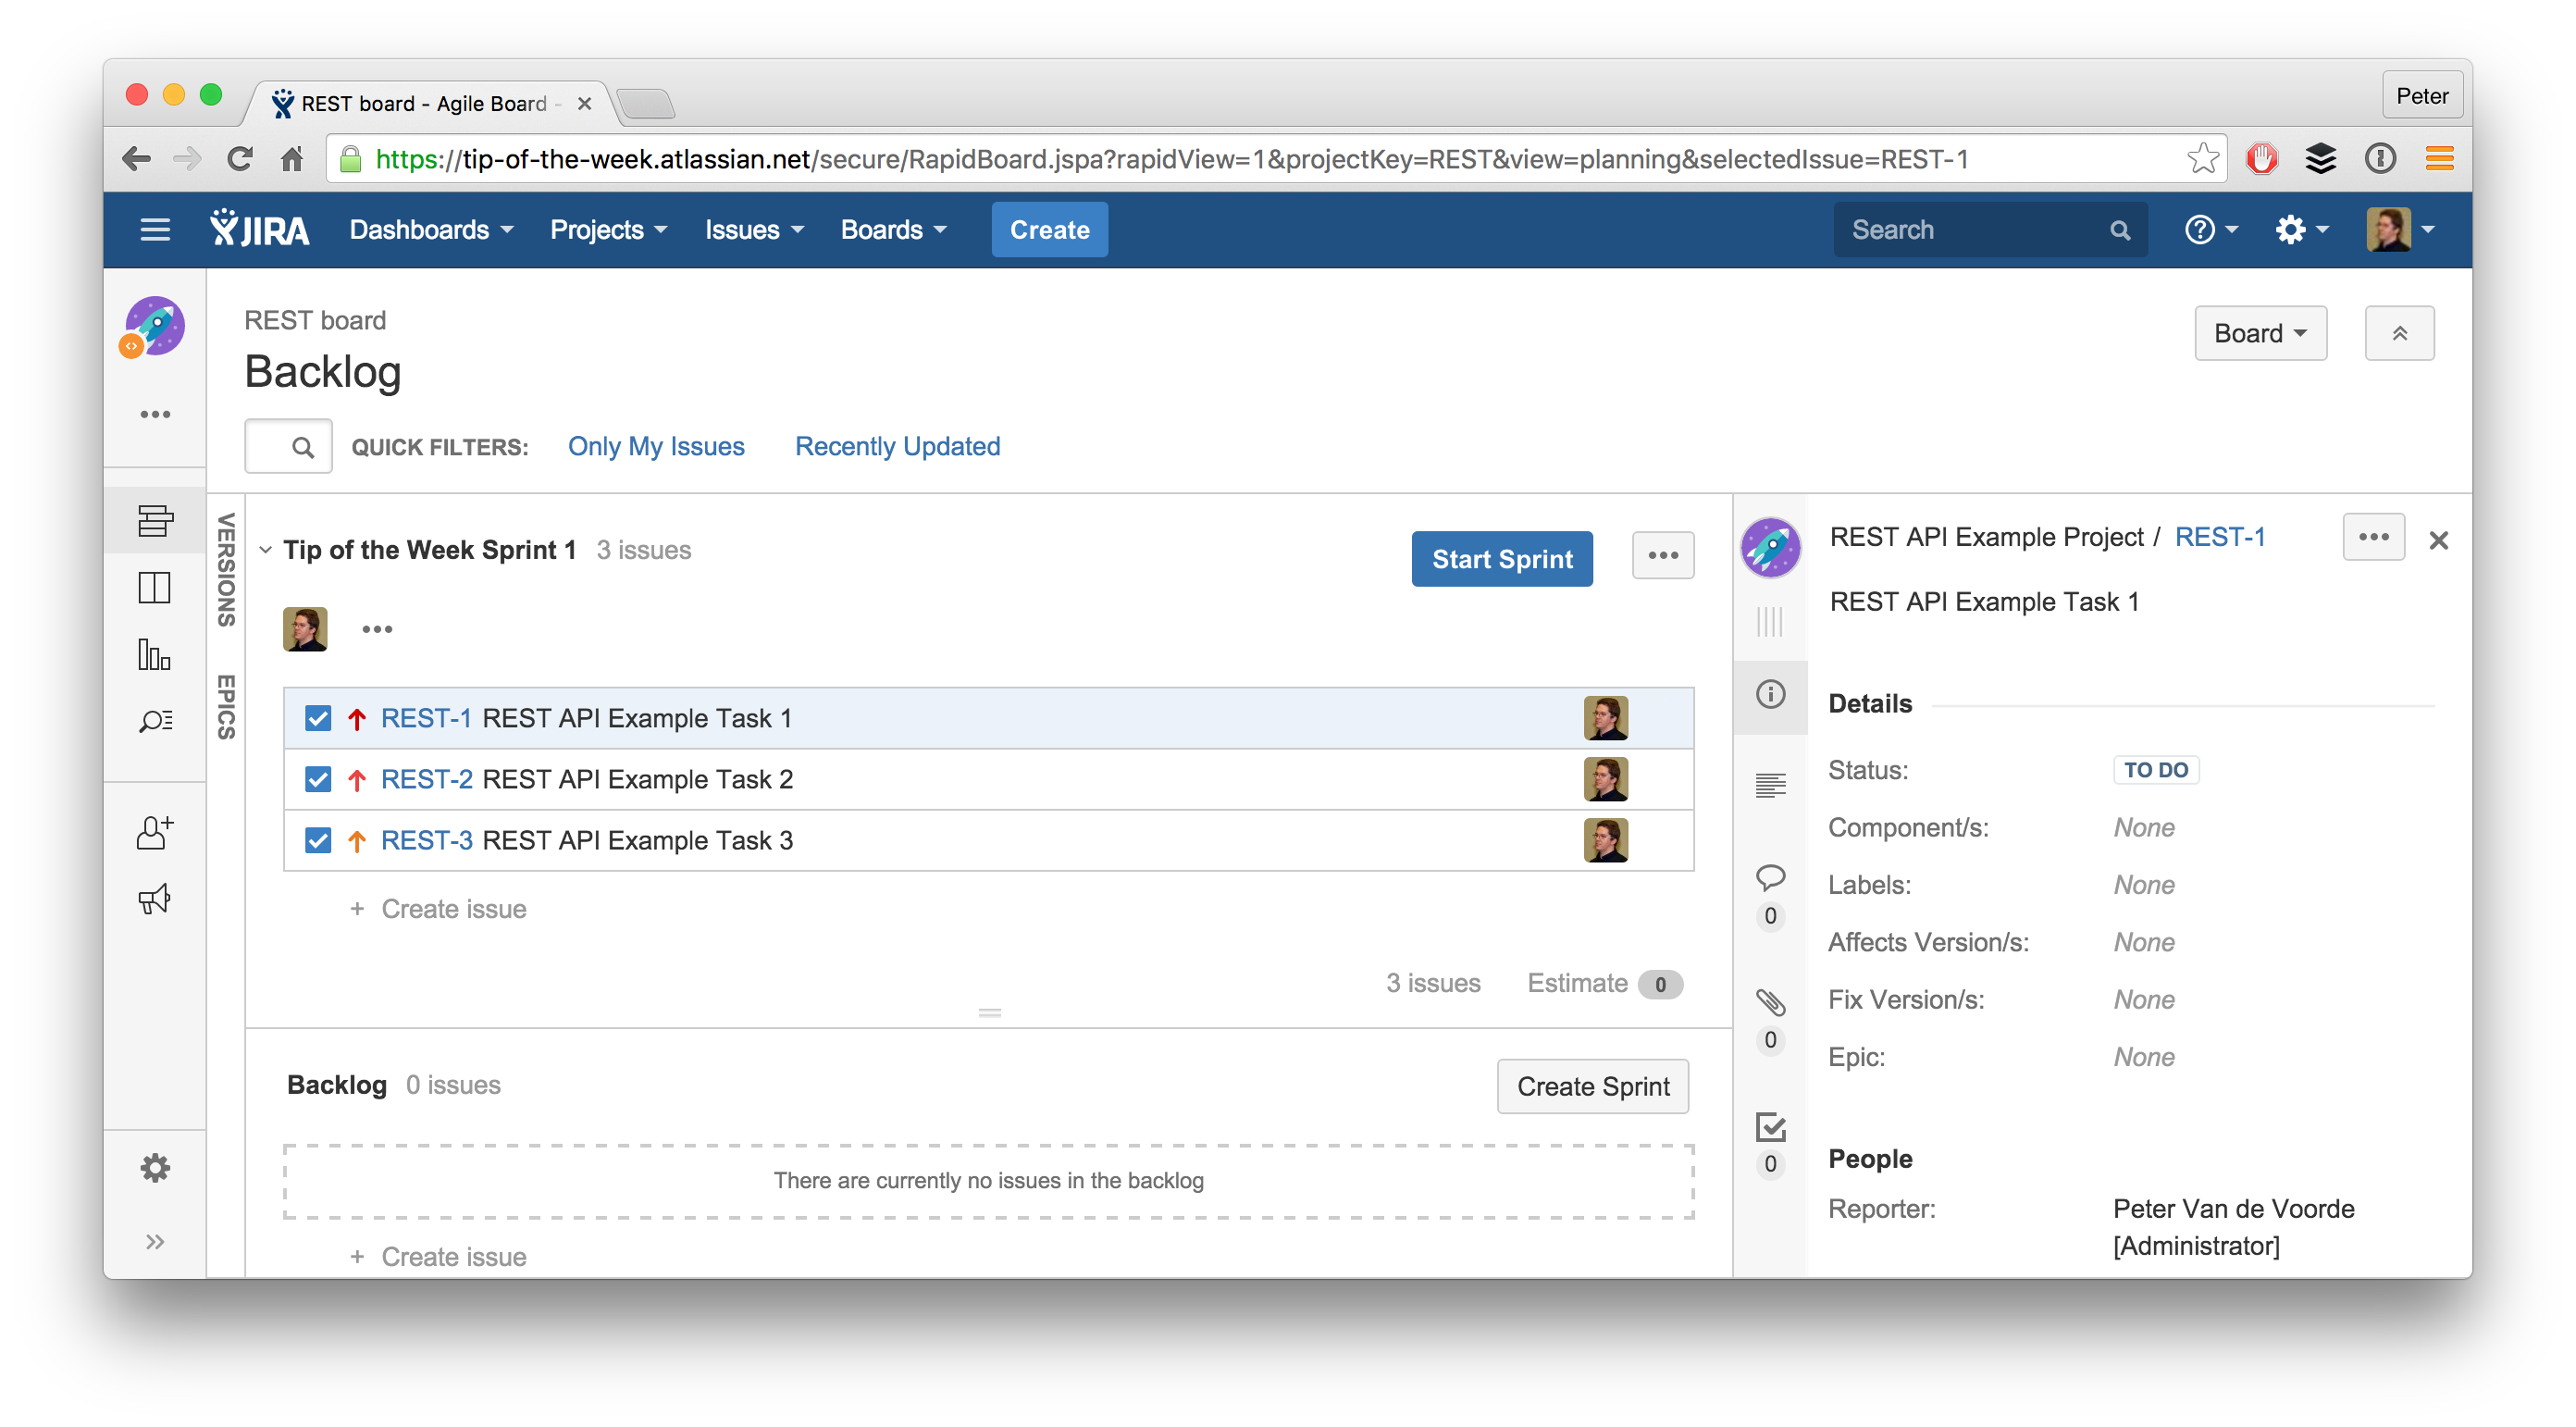
Let’s add our 3 issues to this sprint:
curl -u admin -H "Content-Type: application/json" -X POST -d '{
  "issues": [
     "REST-1",
     "REST-2",
     "REST-3"
 ]
}' https://tip-of-the-week.atlassian.net/rest/agile/1.0/sprint/1/issue
And here you can see the result:
- Starting our first sprint
Let’s get this sprint started!
curl -u admin -H "Content-Type: application/json" -X POST -d '{
  "state":"active"
}' https://tip-of-the-week.atlassian.net/rest/agile/1.0/sprint/1 | python -m json.tool
We get all the available information back in JSON:
{
  "endDate": "2015-12-10T16:22:00.000+01:00",
  "id": 1,
  "name": "Tip of the Week Sprint 1",
  "originBoardId": 1,
  "self": "https://tip-of-the-week.atlassian.net/rest/agile/1.0/sprint/1",
  "startDate": "2015-12-04T06:22:00.000+01:00",
  "state": "active"
}
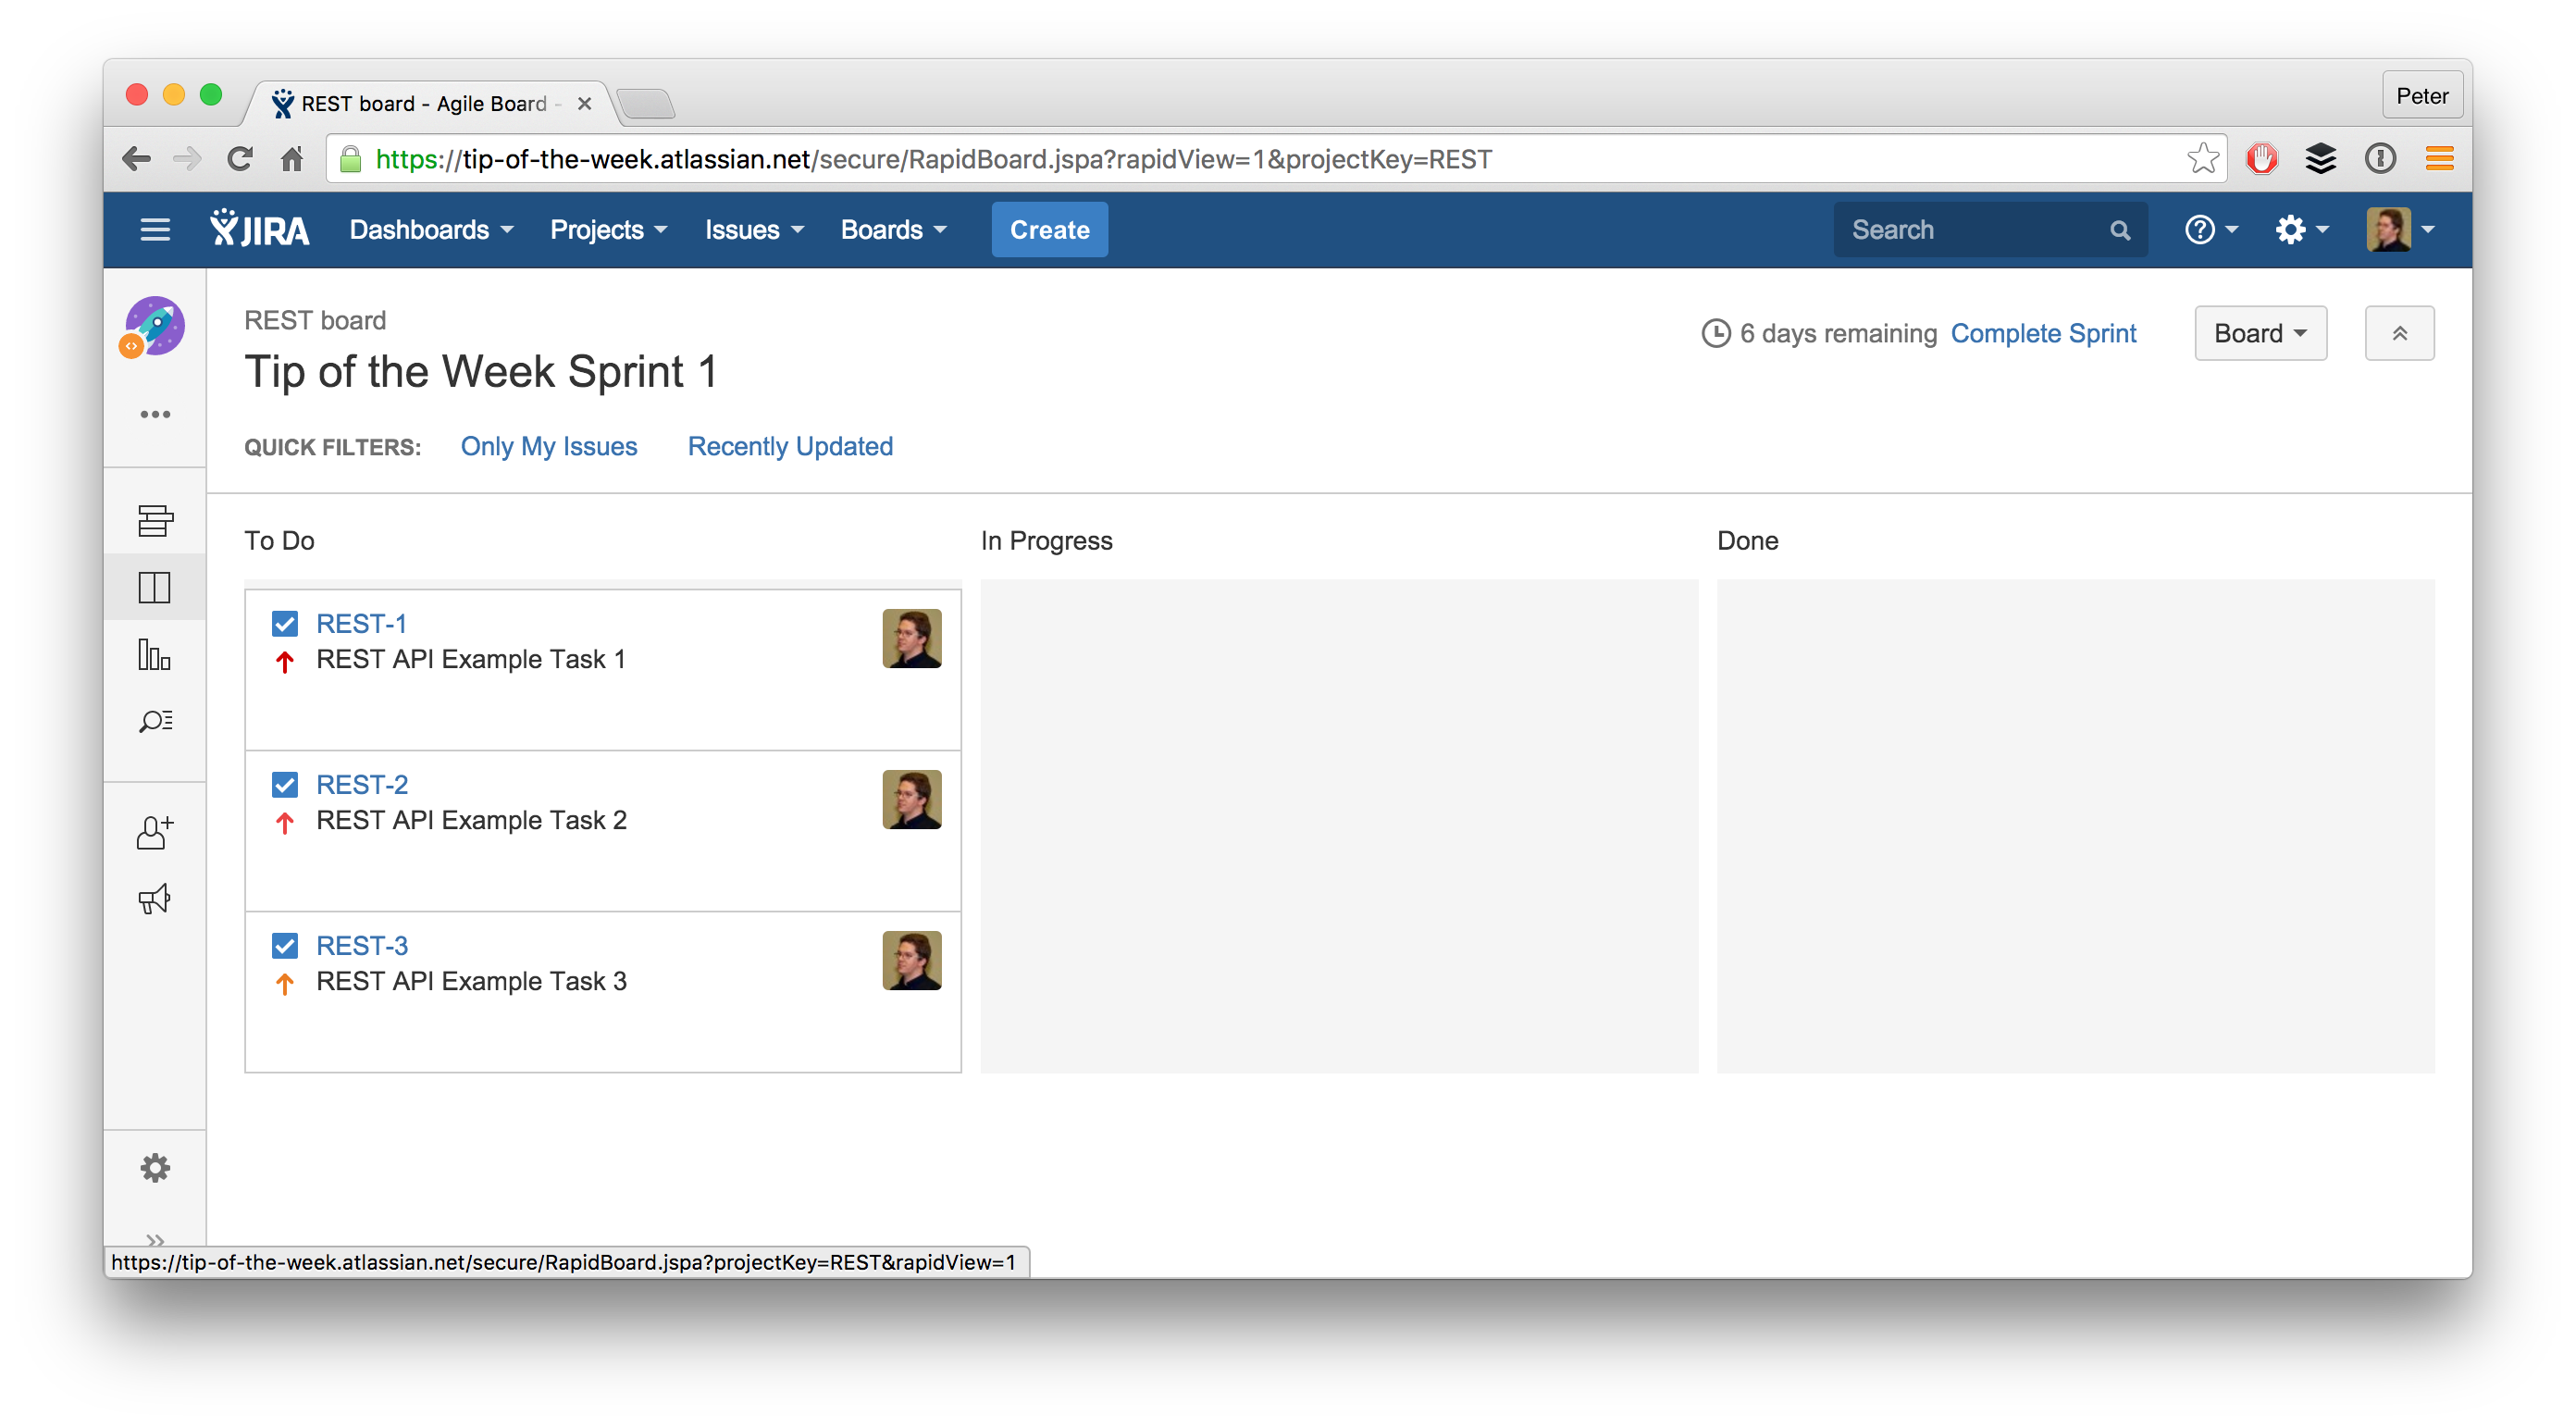
And our sprint has now officially been started:
- Moving issues through the workflow
Now we can move our issues through the different steps of our workflow.
We’ll first need to know the available transitions, REST to the rescue!
curl -u admin -H "Content-Type: application/json" -X GET
https://tip-of-the-week.atlassian.net/rest/api/2/issue/REST-1/transitions | python -m json.tool
This gives us the following available transitions:
{

"expand": "transitions",
"transitions": [
    {
        "id": "11",
        "name": "To Do",
        "to": {
            "description": "",
            "iconUrl": "https://tip-of-the-week.atlassian.net/",
            "id": "10000",
            "name": "To Do",
            "self": "https://tip-of-the-week.atlassian.net/rest/api/2/status/10000",
            "statusCategory": {
                "colorName": "blue-gray",
                "id": 2,
                "key": "new",
                "name": "To Do",
                "self": "https://tip-of-the-week.atlassian.net/rest/api/2/statuscategory/2"
            }
        }
    },
    {
        "id": "21",
        "name": "In Progress",
        "to": {
            "description": "This issue is being actively worked on at the moment by the assignee.",
            "iconUrl": "https://tip-of-the-week.atlassian.net/images/icons/statuses/inprogress.png",
            "id": "3",
            "name": "In Progress",
            "self": "https://tip-of-the-week.atlassian.net/rest/api/2/status/3",
            "statusCategory": {
                "colorName": "yellow",
                "id": 4,
                "key": "indeterminate",
                "name": "In Progress",
                "self": "https://tip-of-the-week.atlassian.net/rest/api/2/statuscategory/4"
            }
        }
    },
    {
        "id": "31",
        "name": "Done",
        "to": {
            "description": "",
            "iconUrl": "https://tip-of-the-week.atlassian.net/",
            "id": "10001",
            "name": "Done",
            "self": "https://tip-of-the-week.atlassian.net/rest/api/2/status/10001",
            "statusCategory": {
                "colorName": "green",
                "id": 3,
                "key": "done",
                "name": "Done",
                "self": "https://tip-of-the-week.atlassian.net/rest/api/2/statuscategory/3"
            }
        }
    }
]
}
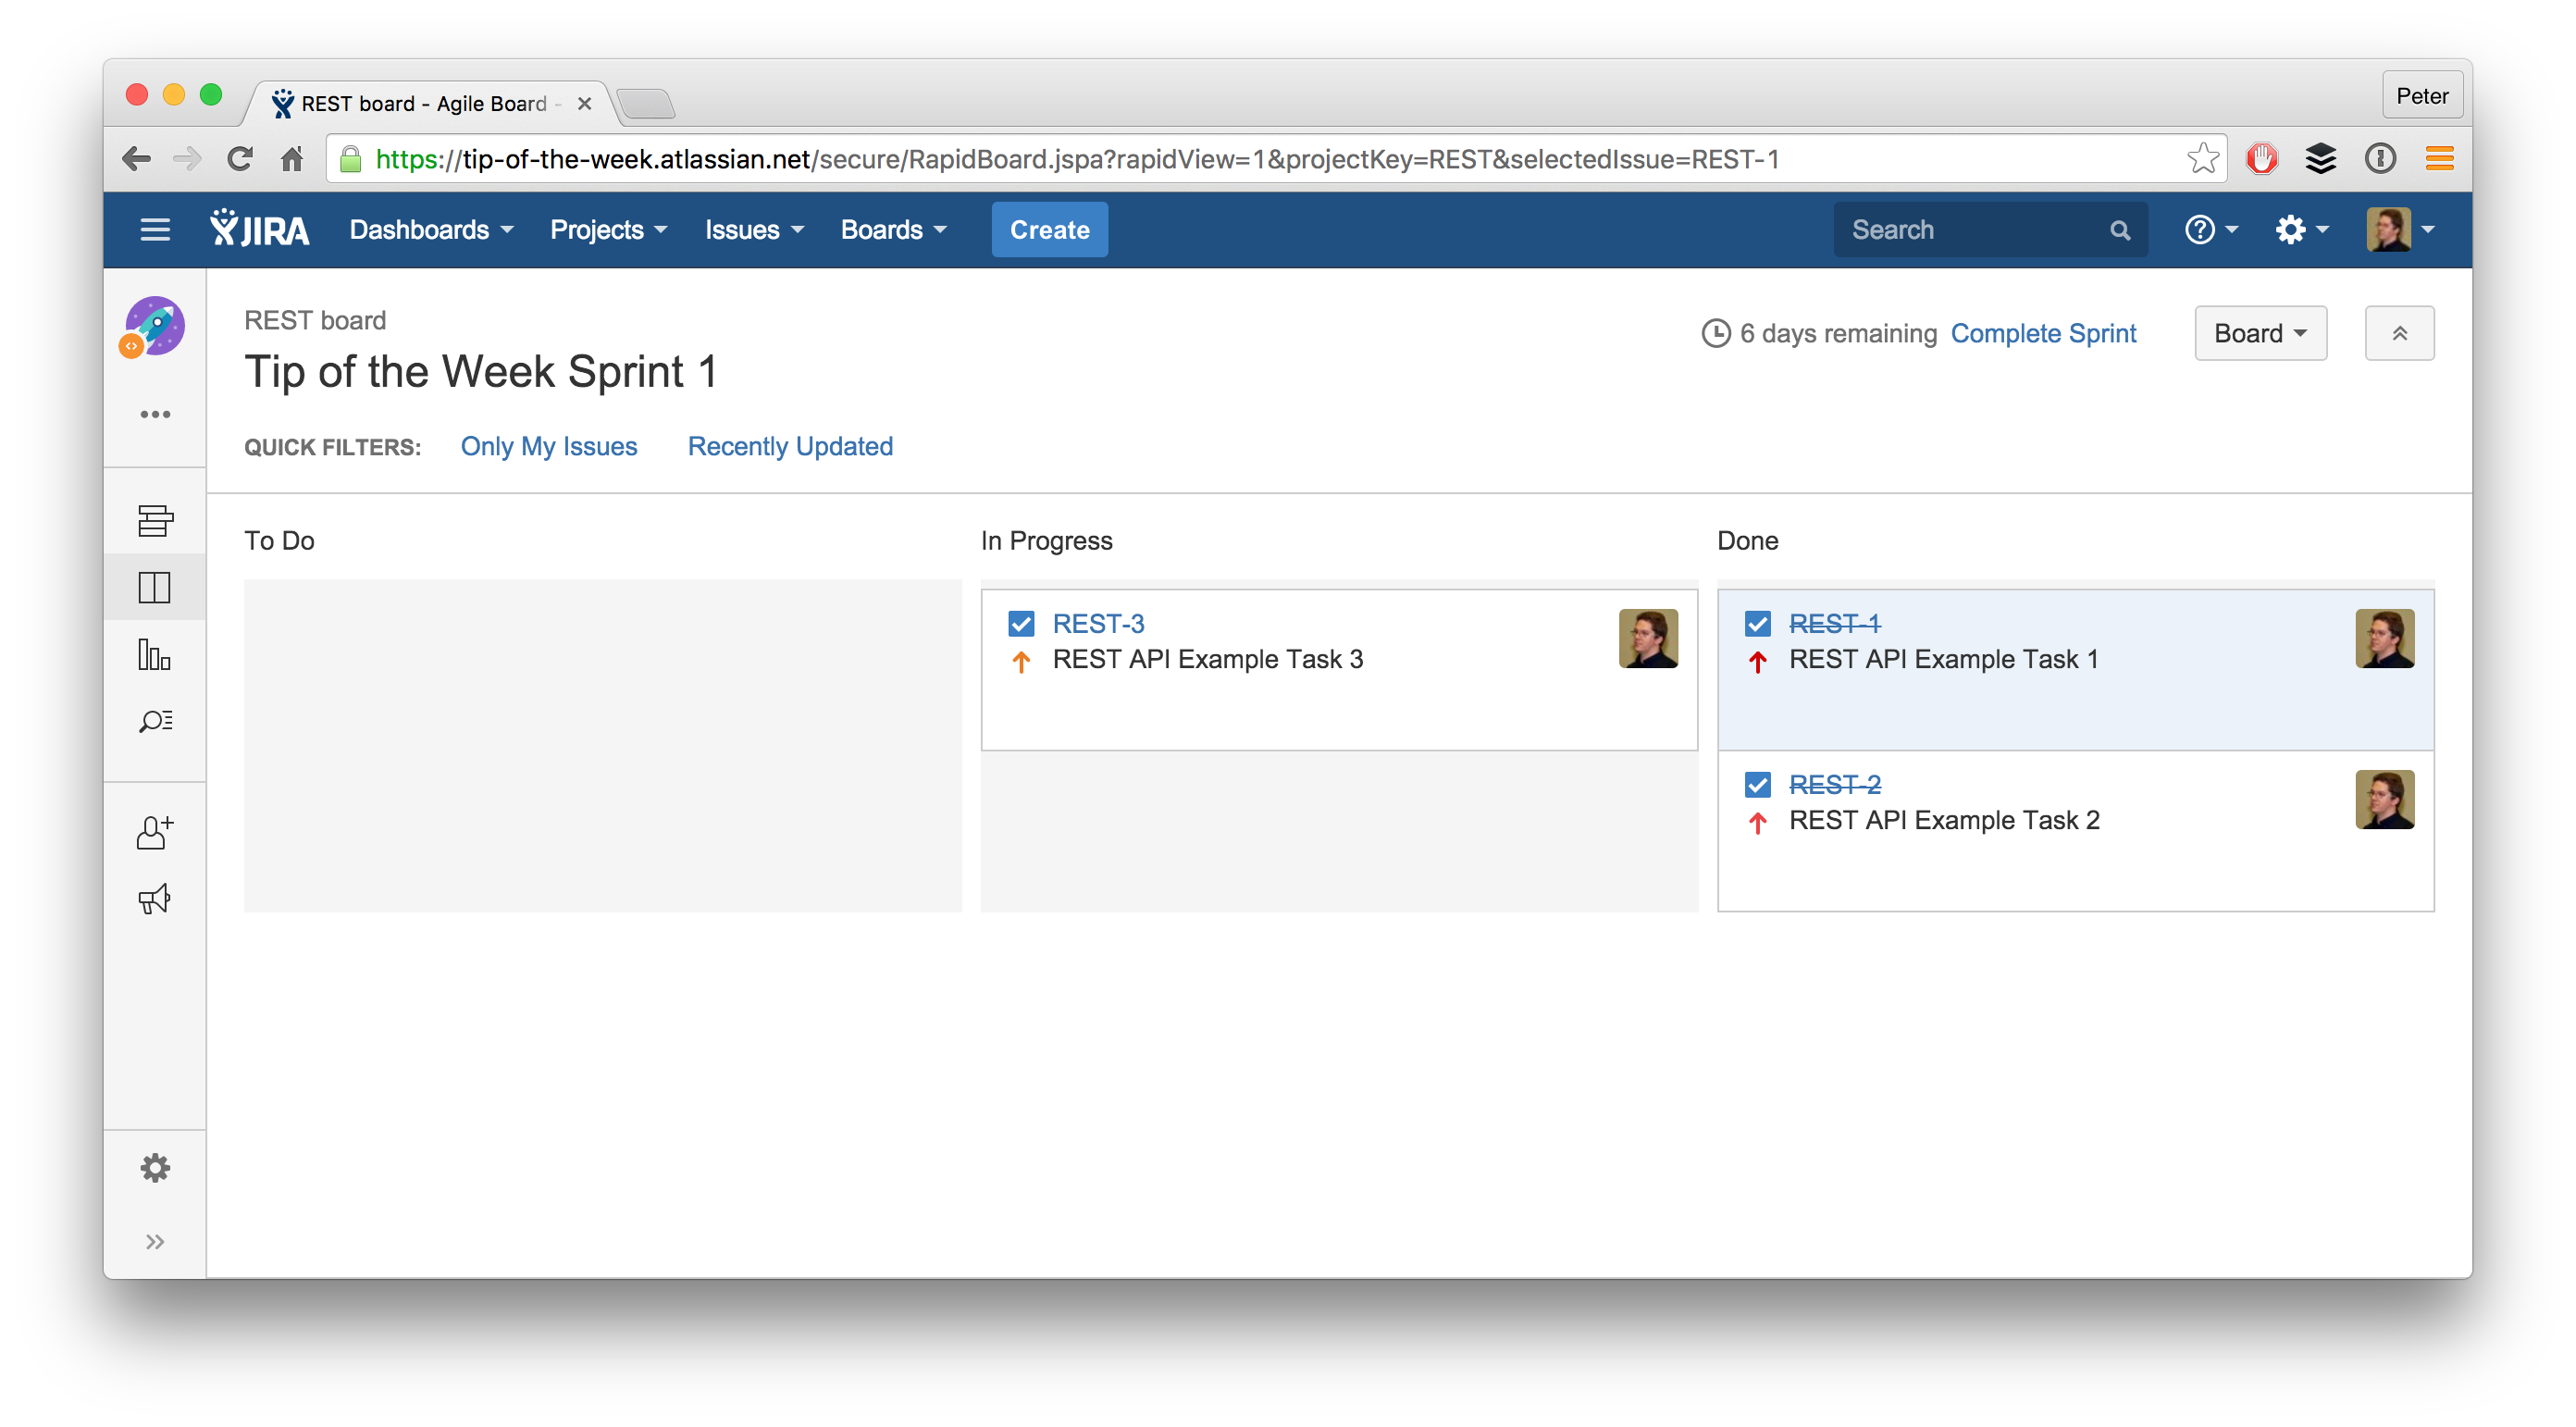
So let’s move 2 issues into Done and 1 into In Progress.
curl -u admin -H "Content-Type: application/json" -X POST -d '{
  "transition": {
    "id": "31"
  }
}' https://tip-of-the-week.atlassian.net/rest/api/2/issue/REST-1/transitions

curl -u admin -H "Content-Type: application/json" -X POST -d '{
  "transition": {
    "id": "31"
  }
}' https://tip-of-the-week.atlassian.net/rest/api/2/issue/REST-2/transitions

curl -u admin -H "Content-Type: application/json" -X POST -d '{
  "transition": {
    "id": "21"
  }
}' https://tip-of-the-week.atlassian.net/rest/api/2/issue/REST-3/transitions
Which gives the following board:
- Finishing our first sprint
To round it off we’ll finish this sprint, even though one issue hasn’t been completed yet.
curl -u admin -H "Content-Type: application/json" -X POST -d '{
  "state":"closed"
}' https://tip-of-the-week.atlassian.net/rest/agile/1.0/sprint/1 | python -m json.tool
This once again returns all the available information for this sprint:
{
    "completeDate": "2015-12-01T21:30:14.203+01:00",
    "endDate": "2015-12-10T16:22:00.000+01:00",
    "id": 1,
    "name": "Tip of the Week Sprint 1",
    "originBoardId": 1,
    "self": "https://tip-of-the-week.atlassian.net/rest/agile/1.0/sprint/1",
    "startDate": "2015-12-04T06:22:00.000+01:00",
    "state": "closed"
}
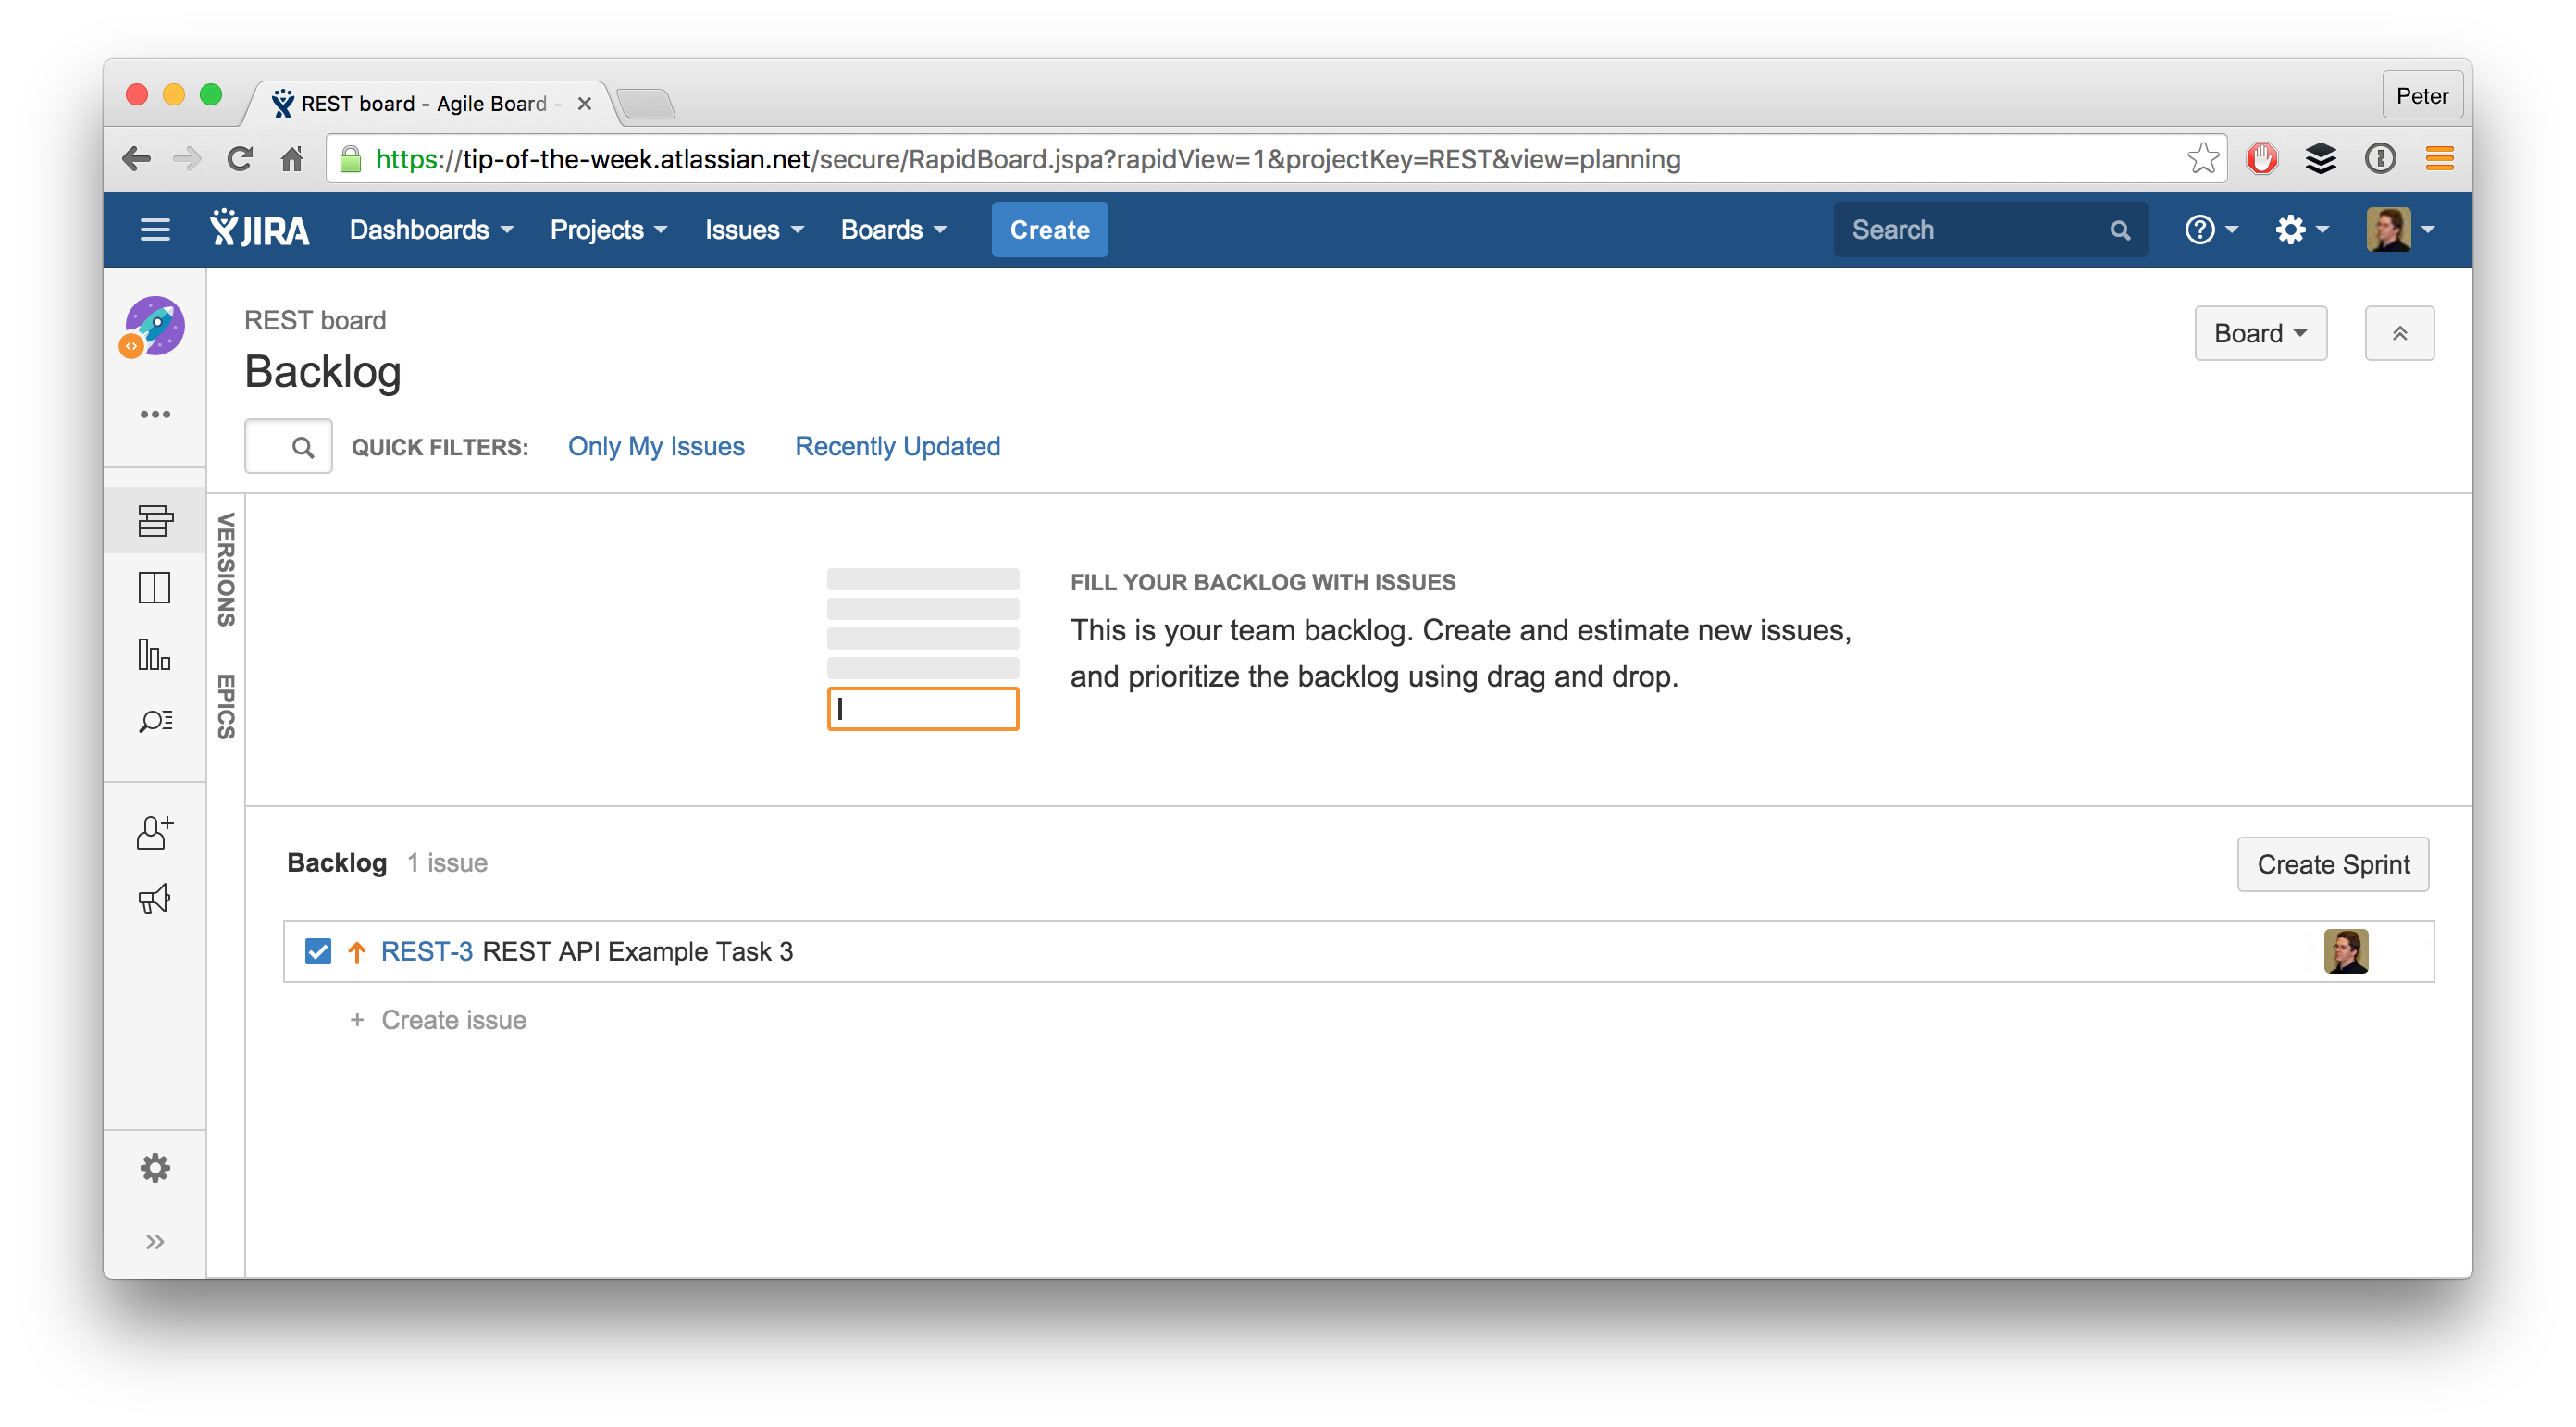
And as you can see our unfinished issue is back on top of the product backlog.
This is only one of the many things you can do using the JIRA Software REST API.
For those who need something to start here is a small script you can use to create a project and some issues: Set-up Test Project Script. Keep in mind that this is just an example script.
Enjoy the REST API and please share this article if you found it helpful!